I would like to thank all the staff in the Computer Science Department, who have been so understanding during these 2 years of doing honours and working at the same time. In particular Prof Shaun Bangay who is not only a collegue but a very supportive and encouraging supervisor. Thank you also goes to Dr George Wells, a great landlord and proofreader!
Thank you to Tina, Cheryl and Michelle, the most effecient and friendly secretaries a department can have who also listened to all the progress of VRFish, got all enthusiastic when it went well and very encouraging when I was frustrated.
Then finally but not least a very big thank you to my family. Firstly my husband Kevin, without his support and encouragement I would have never been able to complete my honours, and secondly to Jessica for waiting until the writeup was in before arriving.
We create a library object, called VRFish, which is self contained and can be used with ease by virtual reality programmers to create diverse and interesting underwater environments.
Virtual Reality is a technique for creating a computer generated environment, intended to immerse the user in another world. The aim is to achieve another dimension which is indistinguishable from reality. Unfortunately we are far away from achieving this. Most of the virtual environments are simplistic and sparsely populated mainly due to the time required to create the inhabitants and background objects. There are very few libraries available to enable virtual environment programmers to produce interesting and diverse creatures within their new world without having to create and program the creatures and objects themselves.
The aim of this project is to provide a component for easily populating an interesting and diverse world. One of the virtual reality environments created in RHoVeR, the virtual reality system designed by the members of Rhodes Virtual Reality Special Interest Group, is Atlantis, where one can go swimming with the dolphins. It has water, dolphins and some seaweed, but what it really requires is other fish, a variety of fish which could be added and left to swim as they pleased. This is the inspiration for this project.
We want a fish library object which could be used to create a number of diverse fish. There is a need to create different fish species. But as it is meant to be a ``plug and play'' library object one should not expect the user to create the 3D fish form before using the object. The fish needs to be autonomous. We do not want the behaviour of the fish to be scripted as this will require programmer intervention whenever it is added to a new system or virtual environment.
The requirements of this project can therefore be summarized as follows:
As the project had two main areas of interest, we looked at the related works in these two areas. Firstly the modeling of the actual fish and any animation of the fish form, and then the group behaviour of the fish.
There have been a number of different techniques proposed for modeling 3D forms. Some methods seem easy to implement, while others have a great deal of complexity and mathematics behind them which implies that they will be more CPU intensive.
One can use off the shelf 3D modeling packages such as NewTek's Lightwave 3D to create a model. There are many tutorials to be found on the WWW for creating and animating 3D forms using these well known packages [28]. One can also use data from models constructed by someone else. Proudfoot et al. [12] used data of a fish form, created by Terzopolous [23], quite successfully, and added bump-mapping to the body and transparent bump-mapping to the fins to produce a static scene of a fish. Fröhlich [6] used Softimage and Alias/Wavefront to create a textured polygonal geometry structure, which they animated by using the software tools and then storing a number of keyframes to be used by their system later on. The smooth animation of the individual fish is created using linear interpolation between corresponding vertices of each keyframe. They produced very realistic fish in their Virtual Oceanarium.
Creating 3D models using modeling packages is time consuming. Obtaining data for the fish model from someone else's research limits the choice of what is available. Therefore we do not feel that this is the best option.
Ebert [5] presents an alternative in procedural modeling. He defines procedural modeling as ``code segments or algorithms used to abstract and encode the details of the model instead of explicitly storing vast numbers of low-level primitives''. He goes on to state that the algorithm provides flexibility and removes the burden of low-level control from the modeler/animator and that using parametric control can provide a large amount of geometric detail. Procedural modeling therefore presents an attractive option for this project.
There are also many methods of constructing models with the ability to be deformed for animation. A physically based method is proposed by Miller [7] to create legless creatures such as snakes and worms. The creatures are modeled using a mass-spring system. To simulate the contraction of the muscles, Miller animates the spring tensions. Sederberg [16] uses free-form deformation based on Bernstein polynomials, which can be applied to any surface primitives. Terzopoulos et. al. [21] proposes an elastically deformable model. By solving the differential equations that underly the model they create realistic animations. In Turner and Gobbetti's paper [24] they state that physics-based deformations derived from elastic and viscous properties of continuous media can produce realistic looking simulations but can be difficult to control. Platt and Barr [13] proposed methods using mathematical constraints based on physics and optimization theory to create and control physically based flexible models. Chadwick et. al. [3] propose a layered construction approach to create deformable animated creatures, where the creatures are built in layers with the relationship between the layers being specified by parametric constraints. Terzopoulos[20] uses an image-based modeling techniques to convert photographs of real fish into 3D B-splines, which he then textures. To achieve the texturing he uses a snake-grid tool to obtain the nonuniform coordinate system for mapping the texture onto the spline surface. He then creates the muscles for the locomotion using 23 nodal point masses and 91 springs. Twelve of the springs running the length of the body also serve as simple muscles. The spring-mass model use Lagrange Equations to control the movement [23].
Although using physically based models produces realistic creatures, the models are by nature complex to implement and normally are computationally intensive.
The flocking algorithm for bird objects first created by Craig W Reynolds [15] is the obvious one to base fish schooling behaviour on. Reynold creates an approach which uses simulation as an alternative to scripting the path of the birds individually. Scripting a path for each bird within a flock using traditional computer animation techniques is tedious and makes the animation rather static. Reynolds states that the behaviour of a flock is simply the result of the interaction between the behaviours of the individuals.
Reynolds bases his method on Reeves' particle systems [14]. Particle systems are collections of large numbers of individual particles, where each particle has its own behaviour and properties. Particle systems are used to represent dynamic ``fuzzy objects'' which have an irregular and complex shape. Particle systems are used to model fire, smoke, and clouds. Reynolds replaced the simple dot-like particle of Reeves particle system with an entire complex geometrical object consisting of a full local coordinate system and a reference to a geometrical shape model. He also adds an orientation attribute to the particles. The particles in the particle system, as presented by Reeves, do not interact with one another. In nature birds do, and hence the objects in Reynolds' flock must interact with each other in order to flock correctly.
Reynolds names his objects boids (short for bird objects). Each boid's behaviour is dependent on an internal state and an external state, the internal state being its own location, direction and velocity, the external state includes the location and state of the other boids as well as any other objects which have to be avoided in the environment.
Reynolds states that natural flocks never seem to get overloaded, or obtain a maximum flock size. This implies that the individual bird does not pay attention to every single bird within its flock. A bird might be aware of three categories: itself, its two or three nearest neighbours, and the rest of the flock [11]. Hence when creating a simulation the boid should only concentrate on its immediate neighbours.
To build a simulated flock, Reynolds starts with a boid model that supports geometric flight. He adds behaviours that correspond to the opposing forces of collision avoidance and the urge to join the flock. Stated briefly as rules, and in order of decreasing precedence, the behaviours that lead to simulated flocking are:
Each of the rules produce a suggested direction in which to steer the boid. Each rule has an associated fractional ``strength''. The boid has to collect the different suggested directions, combine, prioritize and arbitrate between potentially conflicting urges. One could use some artificial intelligence algorithm to do this, but an easier way is simply to average them.
Reynold's Boid software was written in Symbolic Common Lisp. With a flock of 80 boids, on a single Lisp Machine without any special hardware accelerators, the simulation runs for about 95 seconds per frame.
Conrad Parker [10] has suggested a simplified version of Reynolds boid algorithm. His algorithm involves simple vector operations on the positions of the boid. Each of the boid rules work independently and produce a vector. The first rule: staying a safe distance from its neighbours, looks at all the boids in the environment. If the boid is within a specified small distance then the current boid needs to move an equal distance, but in the opposite direction. The second rule: Match velocity, calculate the perceived velocity and add a small proportion of it to the boid's current velocity. Perceived velocity can be defined as the velocity of all the boids, excluding the velocity of the current boid. The third rule: Fly towards the center, find the perceived average position of all the boids and return a fraction of it. Parker suggests that it might be a good idea to use non-constant multipliers for each of the rules, allowing the influence to be varied over the course of the simulation.
Terzopoulos et. al. [22] use a much more complex behaviour algorithm for their artificial marine life. They use computer vision algorithms to enable their creatures to ``see'', and learning algorithms to allow them to gain complex motor skills similar to trained marine mammals.
Their behaviour model is controlled by an intention generator. The intention generator obtains information about the fish's habits, mental state and incoming sensory information and then issues an intention. Its will then choose and execute a behaviour routine. The purpose of the behaviour routine is to bring the fish one step closer to fulfilling the intention during the current time step.
The innate character of the fish is specified by a set of mental variables, with the value range [0;1]. The closer to one the value is, the higher the urge of that particular mental state.
Terzopoulos et. al.'s behaviour routines include avoiding-static-obstacles, avoiding-fish, eating-food, mating, wandering, leaving, escaping and schooling.
For this project we want a fish which would not be CPU intensive but would be believable. The overall concept for this project is to create a library object which can be added to a virtual reality environment with minimal programmer time and effort. This means that expecting the programmer to create or find a new fish form for each different species of fish he /she wishes to add to the environment is not an option. We feel that the procedural modeling presents the best option for creating the 3D fish model. It offers a simple model, which will not be computationally intensive during run-time, but will allow a great level of flexibility for the model shape.
For the behaviour we have taken ideas from both Reynolds flocking algorithm and Terzopoulos's behaviour model. We implement a minimalistic flocking algorithm, and a wandering procedure. We believe this to be sufficient for this project, although we realize that the behaviour model could be improved upon by including more behaviour routines.
In this chapter we give a brief overview of the system in which our fish object has been implemented, followed by the background material required for those readers who are not familiar with OpenGL.
Our fish object, which we will refer to as VRFish, is implemented in RhoVeR, the virtual reality system designed by the Rhodes Virtual Reality Special Interest Group. RhoVeR was developed to serve as a platform for developing virtual environments and testing critical aspects of Virtual Reality.
The current version of RhoVeR, called GreatDane is a Java implementation under Linux. It has a Java module called GL which uses native C calls to incorporate OpenGL for rendering.
GreatDane maintains a database of all objects in the current environment. This database has a list of properties for each objects, such as a string identifier to specify the type of object, the velocity, location and orientation of the object.
This section can be skipped over by OpenGL experts.
When using OpenGL a 3D model has to be constructed out of a small set of geometric primitives -- points, lines and polygons. These primitives are specified by their vertices. The polygons must be simple (i.e. they cannot intersect), and they must be convex (i.e. given two points in the interior of the polygon, the line segment joining them must also be in the interior.) The triangle is by definition simple and planar and is therefore used within this project.
OpenGL approximates light and lighting as if light can be broken into red, green, and blue components. Therefore, the colour of light sources is characterized by the amount of red, green, and blue light they emit, and the material of surfaces is characterized by the percentage of the incoming red, green, and blue components that are reflected in various directions.
The colours across the face of a smooth-shaded polygon are determined by the colours calculated for the vertices. The normal vectors at the vertex determine the orientation of the object relative to the light source and therefore control the intensity of the highlight at the particular vertex. Therefore any surface should be created out of a number of smaller polygons rather than larger ones.
One can specify colour in RGB or RGBA mode. The three component colour, RGB specifies the Red, Green and Blue for the colour. In the four component colour, RGBA there is a fourth value which is called the alpha value. The alpha value does not correspond to a visible colour, but can be thought of as the opacity value.
A buffer is the storage of data for each pixel. Within a given buffer each pixel is assigned the same amount of data per pixel. The OpenGL system can manipulate the following buffers: Colour, Depth, Stencil and Accumulation [1] [9].
To render an image OpenGL performs the major graphics operations in the following order:
The tests are performed in the following sequence [9] :
The alpha test compares the incoming fragment's alpha value to a constant. The comparison function used can be set to always accept the fragment, never accept the fragment, or to accept it depending on the value of the fragment's alpha compared to the reference value. [26]. If the fragment passes the test then it will be processed by subsequent fragment tests, otherwise it will be discarded. The alpha test provides a means to reject the fragment as early as possible in order to reduce the memory traffic due to stencil, depth and colour buffer reads and writes [4].
The stencil test compares a reference value with the value stored at a pixel in the stencil buffer. The value in the stencil buffer is modified depending on the result of the test. The comparison function, reference value and new value or mask can be set [9] using:
The stencil value for the target pixel is first masked against the current stencil mask, then compared against the current stencil reference value, using the current stencil comparison function [17].
The function:
If the test fails, then the fragment for the pixel is discarded, and the colour and depth values remain unchanged.
The alpha test and stencil tests are used in the rendering method discussed in Chapter 5 Section 5.2.2
VRFish has to be "plug and play". We do not want the user to have to create or obtain a 3D model of a fish before using VRFish. But we also want to be able to allow for variety. So we create the 3D model procedurally instead of creating it using 3D modeling software or using data from someone else's work. In order to allow for variety, there are many parameters which are specified by the user. These parameters are stored in a ASCII file, which we will refer to as the parameter file. An example of a complete parameter file can be found in Appendix A.
In this chapter we will explain what values are required and why they are required. Most values in the parameter files are expected to be double values. Currently the user is required to set up the values in the parameter file, using a trial-and-error method, in order to create the fish he/she desires. We believe that it would not be difficult to set up a GUI application to aid in this process.
The design, motivations and some relevant implementation details are covered in this chapter for the construction of the fish model.
The body is represented by a rigid model, which currently does not allow any deformations. It is constructed by rotating a mathematical function around the x-axis to obtain a closed surface. Any a mathematical function which is closed in the region 0 and 1 can be used. There is an abstract FishShapeFunction class which the classes in VRFish use. The name of the actual implementation of this class is specified in the parameter file, to allow for the user to select which mathematical function best describes their choice of body shape.
We have only implemented one child class of FishShapeFunction at this stage. FishShapeSin which implements a sine curve. We elected to use this function as it approximates the body shape of a large number of fish.
There are many different types of fish body shapes and we want to allow the VRFish to be easily extended to incorporate more of them. For example one can see the body shape for the Hawk and Angel fish. The graph in Figure 4.1 could be used in order to get the shape for the Hawk fish, similarly the graph in Figure 4.2 to achieve the top half of the body for the Angel fish.
One could use a cubic spline interpolation [2] to approximate the curve of the shape of the body and to create additional subclasses of FishShapeFunction class. This would allow a wider variety of different body shapes to be created using VRFish, within the same environment. We feel that by implementing one, it is sufficient for proof of concept.
The user specifies two values which control the level of detail of the fish. The two values, which we will called BodySections and CircleSections, control how many points are used in the creation of the surface and therefore how closely the end shape approximates the true mathematical surface which has been specified in the FishShapeFunction's subclass. Figure 4.5 shows some different levels of detail. The triangles are drawn on the body to show the level of detail.
Although we have not implemented a change in the level of detail during run-time, it is theoretically possible to recalculate the body points during run-time to allow for fish of a lower level of detail, when the fish is far away from the viewer. This will improve performance when the fish is a large distance from the viewer.
The BodySection specifies the number of sections the function is divided into along the x-axis. Each of these x-values are then used to calculate the height of the function at that x-value. This height forms the radius of the circle as this point is rotated around the x-axis.
The CircleSections specify how many sections the circle is then divided into. The points on the circumference of the circle at each circle section are then calculated. These points are used to specify the vertices of the triangles which make up the surface of our fish in OpenGL. We will call these points BodyPoints
Once all the points are calculated they need to be grouped to form
triangles which can be used in the rendering process (Figure
4.3).
In Figure 4.4 to calculate
the normal at point A, the normal vectors are found for the triangles
1 through to 6, and then averaged.
We use a VRTriangle class which stores the BodyPoints, the
corresponding normal vectors and the matching texture points (discussed
in Chapter 5, Section 5.1)
for the triangles.
Each of the BodySections is circular, and the length of the body is
between 0 and 1. This can produce a very short, fat body. To adjust
the proportions we have included 3 scaling factors, one for the each
of the x, y, and z directions. The user specifies
these in the parameter file. (See Figure 4.6
)
There is also another scaling factor which affects the entire fish
size. When registering the VRFish with the GreatDane database,
one includes an object world scale. We incorporate some randomness
at this point, and make this world scale using random numbers. This
means that as the fish are created within an environment their sizes
will differ slightly.
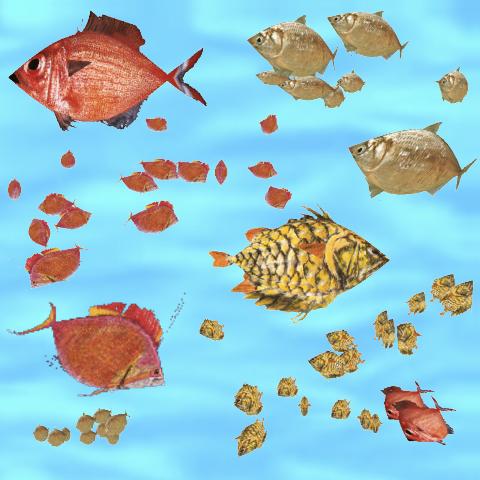
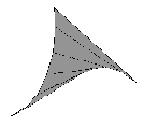
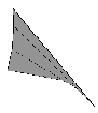
Figure 4.7 shows the fins of a fish.
In nature there is a wide variation in shape and placement of these
fins, as can be seen in Figure 4.8.
The design of the fins allows for this wide diversity.
The caudal fin (the tail) is made up of two sets of triangles. The
number of triangles, or level of detail is specified by the user.
The shape of the caudal fin is controlled by six user specified values.
These are: the length of the top, middle and bottom lines, the top
angle which is the angle the top makes with the middle line, the bottom
angle which which is the angle the bottom makes with the middle line.
These can be seen in Figure 4.9.
The triangles are formed using linear interpolation to obtain the
other two points on the line formed by joining the end points of the
top and middle line. (Similarly on the middle and bottom line.)
We believe this allows for a great number of differently shaped caudal
fins. (See Figure 4.10 for some variations).
Figure 4.10 shows some variations in
the shape of the caudal fin, depending on the parameters.
The caudal fin is formed at the origin and then translated into position.
The exact position is specified by the user as a 3D point. This allows
the user to vary the thickness of the body-tail section. (Figure
4.11 shows some different locations for the caudal
fin.)
The vertical fins, namely the dorsal, adipose and anal fins use the
same design structure, but each need their own specified values in
the parameter file. When designing these fins we want to allow for
diversity, and to have an end shape which appears curved, angular
or straight. The fin is created in the position desired. The user
chooses where along the body the fin is placed by specifying the start
and end BodySections the fin is to span. The level of detail of these
fins is therefore limited by the level of detail of the body.
The fin is vertical at the top or bottom of the fish, where z
= 0. To control the shape the user specifies the length of the start
and end lines, and the angle made by the start line with the horizontal
line. The curve of the fin is controlled by a value we call the proportion,
and is also specified by the user. The proportion specifies how far
up along the side of the previous triangle the top vertex of the current
triangle is placed. The end angle is always a ninety degree angle.
Figure 4.12 shows the structure
of the vertical fin.
Using this structure the fins shape can be varied a great deal. The
dorsal and adipose fins can be placed so that they form one long fin
if so desired. Figure 4.13 shows
some variations of the dorsal fin.
The pectoral fin is designed along the same lines as the vertical
fin, but is slightly less complex. The level of detail is linked to
the CircleSections but is specified as a number of triangles. As each
triangle spans a CircleSection the user needs to ensure that the CircleSection
from the body and the number of triangles the pectoral fin uses are
related. At this stage there is no check -- if the user specifies
a larger number of triangles then the fin will appear to wrap around
the body.
The user controls where along the length of the body the fin is to
be placed by specifying the starting BodySection. The start of the
fin is specified by the start CircleSection, and the curve of the
fin is controlled by the proportion where one triangle joins the next.
The other user dependent values are the length of the first side,
and the angle which this line makes with the horizontal.
The user enters only the values for the left fin as the right fin
is a mirror image of the left fin.
Figure 4.14 shows the structure
of the pectoral fin.
Figure 4.15 shows some variation
in shape of the pectoral fin.
The pelvic fin needs a different structure as it shape seems to differ
considerably from the other fins. We want to allow for short fins,
or long flowing ones.
The user specifies where along the body the fin it is placed, by giving
the BodySection at which it will start. The vertical placement is
specified by which CircleSection it must be placed on, and the level
of detail is determined by the BodySection on which the fin terminates.
The shape and size is controlled by specifying the length of the line
joining B and C in Figure 4.16,
the length of the end line (line joining F and H in Figure
4.16) and the angle that the end line
makes with the horizontal.
If one uses this shape as the final product, the fin shapes which
can be represented here are fairly limited. However, when it is used
in conjunction with the masking methods (discussed in a later chapter),
it provides a great flexibility for long, or unusually shaped pelvic
fins.
Once again the user is only required to enter the values for the left
fin.
Other parameters pertaining to the fish form which we have not yet
mentioned are the starting position of the fish, its default colour
and various other parameters used for testing purposes (these have
been left in for historical reasons). In the Appendix A
the test parameters have the suffix _t behind their description to
indicate that they fall into this category. The starting position
consists of three numbers for x, y, z. The default colour is stipulated
in RGB, so it has 3 numbers, between and including 0 and 1.
There is a lot of information in the parameter file. Not all the different
objects within VRFish require all the information. VRFishInfo
reads the parameter file and then creates a number of Information
objects. Each object therefore only has information pertaining to
one area. For example VRFishInfo creates several VRFinInfo
objects, each VRFinInfo contains the parameter values for one
fin. This prevents redundancy of information allowing only the required
information to be passed to the objects which make up the fish.
To create a school of fish we have the VRSchool class. VRSchool
uses VRFishInfo to read in the parameter file as described
above. The file is read in only once. VRSchool can then alter
the information objects created in VRFishInfo, to incorporate
some variations for each of the fish within a school. After each set
of changes it creates a fish with the altered information object.
Although all of the user parameters can be changed we only change
to the starting position of the fish at this stage. We spread the
fish out along a straight line within the environment.
We use the VRFishViewer class to display the fish for testing
purposes. When starting VRFishViewer the number of fish per
school is supplied, together with all parameter file names required.
Any number of parameter files can be included at this point, allowing
any number of different fish species to be included in the environment.
All schools will have the same number of fish within them. Fish only
school with their own species.
The 3D fish model is procedural, with user-specified parameters controlling
the shape, size and level of detail of the body shape and fins. The
design is such that it allows a great amount of flexibility, without
the user having to create the form in another package, or obtain a
form from somewhere else. Although the individual components which
make up the body cannot be deformed at present, this is not ruled
out in theory. The points which make up the surface are accessible
and therefore, could be manipulated in some way to create deformations
of the structure.
The only animation of the fish form which is currently implement is
the movement of the fins. This is discussed in Chapter 7
Section 7.1.
Schools of these fish are created in VRSchool and viewed through
VRFishViewer.
A simplified UML type model of VRFish can be found in the appendix
C.
VRFish is created and rendered in a default colour. We add
texturing, and different rendering effects to the fins in order to
obtain a more interesting and realistic fish. We have implemented
four different rendering effects for the fins, but at this stage the
fin method to be used has to be decided on at compile time. There
are various VRFin classes, which can be copied over the VRFin.java
file and then compiled into VRFish. It might be desirable to
change this so that the user can specify which which fin method to
use at run-time by including a corresponding choice variable in the
parameter file.
We first discuss texturing, and then the different fin methods, namely
blending, stencil, alpha, and finally, the stencil and alpha method.
The last two can grouped together as masking techniques as both produce
a ``cutout'' from the fin structure shape. Performance of these
rendering methods are presented in Chapter 8
)
An important point to remember when texturing is that the height and
width of the texture image must be a power of 2 (2, 4, 8, 16, ...).
In order to do texturing every point in the 3D form needs to be mapped
to a corresponding 2D point in the texture file. A stand alone application
called Fixel aids in the calculation of these points for VRFish.
Fixel is discussed in more detail in Chapter 6.
Fixel outputs the texture points to an ASCII file. These points
are then copied into the parameter file.
For the body we do not want the default body colour to influence,
or to alter the texture colour. The DECAL parameter is therefore used
in setting the texture environment variable for OpenGL. Initially
we did the same for the fins, but then replaced this with other techniques
which are discussed in the section following this one.
This texturing is adequate for the rendering of the body, but additional
techniques are required for the rendering of the fins.
To achieve more interesting fins, we implemented and test differented
rendering techniques.
Our first method attempts to obtain semi-translucent fins. To achieve
this we use the blending function in OpenGL.
When setting the texture environmental variables in OpenGL we specify
the way in which the incoming texture colour must be combined with
the colour which is already there.
When using the MODULATE parameter, together with specifying the colours
of the texture in RGB mode, we obtain
colour_final = colour_texture * colour_fragment
alpha_final = alpha_texture * alpha_fragment
Since we are using RGB mode we need to set the alpha value, which
we set to 0.5.
If one attempts to use the RGBA mode for specifying the texture colours,
it influences the texturing of the body, and produces undesirable
effects in the rendering of the body. This is due to the fact that
when using RGBA mode for the colour DECAL uses the following formulae
colour_final = (1-alpha_texture)*colour_fragment + alpha_texture * colour_texture ,
[9].
The blending produces semi translucent fins. It does not have a performance
impact, but the visual effect does depend on how closely the shape
structure of the fins can reflect the desired fin shape.
Figure 5.1 shows the blended fins
for two fish. in both pictures you can see that the pectoral fins
are translucent and the body can be seen through them. The front pelvic
fin allows the fin behind it to show through (Hence in (b)
the pelvic fin looks out of focus.).
Three different methods were attempted to achieve masking to ``cutout''
the fin shape from the fin structure originally built. These methods
have varying degrees of success.
This method uses only the stencil buffer. We understood that we could
use the stencil buffer to create a stencil shape used to prevent drawing
to certain sections of the screen. On attempting to implement this
method, we failed to realize that one does not draw directly to the
stencil buffer. The values are written to the stencil buffer when
drawing a shape to the colour buffer. Although the value written to
the stencil buffer is dependent on the stencil test, it is not dependent
on the colour going into the colour buffer. We draw the shape of the
fin structure to the colour buffer, and therefore either the entire
fin shape is drawn to the stencil, in which case no fin appears, or
nothing is drawn into the stencil buffer in which case the entire
fin is drawn.
Although this attempt was a failure, much was gained through this
exercise. It helped us to obtain a better understanding of the use
of the buffers and tests and how to correctly implement them.
This method is a two pass process. It requires two texture files,
a black and white one and a coloured one. The black and white version
is simply a silhouette of the fish, with the fish in white and the
background in black. These need to be identical in all respects except
the colour, as the same texture points are used in both files. The
black and white texture file is used to create a stencil for masking,
while the coloured one is used when applying the texture to the fish
model.
In the first pass the black and white texture is used to set the depth
and alpha values, using the depth test and the alpha test. In the
second pass only the sections with the correct alpha and depth values
are drawn to the screen.
This produces shapely fins, but also produces unexpected artifacts.
When the fin shape is originally drawn, if it is behind another object,
either a fin or another fish then in the first pass the depth value
will be set as usual, indicating the fin's position along the z-axis.
However during the second pass the fin shape from the black and white
texture file is used. The black section of this shape is rejected
by the alpha test, causing it to be discarded. This means that no
other tests are done on this section. When the fish is translated
or rotated the fin might now end up in front of the object it was
originally behind, but its depth value will not be re-set and the
depth test is never done on this fragment. Therefore nothing gets
drawn to this section of the screen, leaving behind a white silhouette
of the background section in the fin shape.
This method has a slower performance than the blending method due
to the fact that the fish has to be rendered twice.
See Figure 5.2 a, b, c shows where
the one pelvic fin is being obscured by the other fin, thereby making
one of the fins disappear at certain angles of view. Figure
5.2 d, e shows how the entire fin shape shows
up when fish swim in a school.
This method uses both the stencil and the alpha test. As in the alpha
test method, this is a two pass process and uses both the black and
white texture file and the colour texture file.
In the first pass the alpha test is used to create a stencil mask
in the stencil buffer, using the black and white texture. The fragment's
value is discarded if the colour is black, (i.e. the background is
discarded). The second pass then uses this stencil from the stencil
buffer to determine what is finally drawn to the screen.
This method creates the exact shape fin desired. It has no artifacts,
as in the alpha test method. But the disadvantage of this method is
that it is lot slower due to the stencil buffer being cleared each
and every time the fin is drawn.
Figures 5.3 and 5.4
show the fish using this method.
The body is textured and three of the four rendering techniques for
the fins are successful. The blended fin has the best performance.
The alpha and stencil test method has the best visual effect, producing
exotic fin shapes, but it has the worst performance. The alpha method
is faster than the alpha and stencil method, but has some visual artifacts.
Fixel is a stand-alone program designed and implemented to
aid in the calculations of the texture points for VRFish. As
has already been mentioned, each point which makes up the fish form
has to have a corresponding point in the texture file. Texture points
are some times referred to as Texels, hence the name for our application
- FIsh teXELs.
Fixel is written in Java. It is not incorporated into the GreatDane
system. Java has library classes which handle graphics files, hence
Fixel can use many Graphic file formats, but OpenGL uses the
GIF file format and therefore it is recommended that one uses this
type of graphics file when using Fixel.
OpenGL uses a different coordinate system for its graphics files to
Java. OpenGL uses the bottom left corner as (0,0), the top right corner
is (1,1). On the other hand Java uses the top left corner as (0,0)
and the bottom right as (x,y) where x is the width of the picture
and y is the height. Because of this two texture files are required,
one to be used as the texture file in VRFish, and one which
is used in Fixel for determining the texture points. They must
be exact mirror images of each other, reflection being in the horizontal
axis. The one used for Fixel, has the fish the right way up
and the one supplied to VRFish has the fish upside down. This
also means that when Fixel calculates the texture points, the
Java point is converted into a OpenGL point by dividing the x value
of the point by the width, and the y value of the point by the height.
(Fixel could do the inverting, but this has not been implemented
yet.)
The Fixel window consists of a menu bar, which contains 3 menus
(File, Values and Draw), a graphics area (where the graphics file
is displayed) and an instruction bar. The instruction bar has comments,
hints or instructions to give the user some indication of what is
happening, and what is required at any stage. (See Figure
6.1 for a screen shot)
At this time Fixel is very functional and not exceptionally
user friendly.
There are a number of different stages of operation, one per fish
body part, namely for the body, and for the dorsal, adipose, caudal,
anal, pectoral and pelvic fins. Each stage can be started by selecting
it from the Draw menu.
Fixel requires information based on the values in the parameter
file for the fish. The values for each body section must be entered
through the Values menu, before that specific stage is started.
Once the user has completed the stages of his/her choice the information
can be saved. Fixel saves the calculated points in a ASCII
file with the extension .FXL. Each body part saves its texture points
in a list which is preceded by two lines. The first contains a comment
starting with //, which specified which body part the texture points
are for, and the second the number of actual texture points to follow.
Within each stage there are steps which have to be followed in strict
sequential order, in order to obtain the correct points. If a mistake
has been made there are no means to correct, add or delete an individual
point. The stage must be restarted. Although the steps within each
stage are strictly sequential, the stages can be done in any order,
or not done at all.
Each stage is a reflection of the algorithm used in VRFish
to construct that particular body part.
For the body a middle line is drawn across the fish body picture from
its nose to the start of its caudal fin. This means that the fish
in the picture can have any orientation and placement -- it does
not have to be perfectly horizontal in this file. The required number
of vertical lines are drawn by Fixel, evenly distributed across
this line. These vertical lines correspond to the BodySections. The
user adjusts the length of these lines, so that they just cover the
body, starting with the line at the nose and ending with the line
at the caudal fin. This is simple way of doing edge detection for
the body! Fixel then draws the calculated points on the vertical lines.
There is always a point on the intersection of the horizontal line
and the vertical line (this is point number 0 in VRFish). When
the points for the body are saved, each point is saved on a new line
in the ASCII file. Preceding the x and y value in the ASCII file is
the vertical line number and the point number. The vertical line number
corresponds to the BodySection number in VRFish, and the point
number corresponds to the CircleSection. Fixel determines the points
for the back half of the fish body and then saves them in the correct
order corresponding to the points created in VRFish.
For the fins the user has to click on the picture to set certain points.
The points have to correspond to specified points of the fin shape
constructed by VRFish and these points must be done in a certain
order. The required points and their order can be found in the user
manual in appendix B. Once the initial points have been set, Fixel
calculates the remaining points, and draws them in. The user is then
required to either click on the point, or to adjust its location by
clicking where he/she wants it to be. Again the order of the points
is very important.
The texture points for use with the blended fins should have as little
background as possible included, preferably none. However, when creating
the texture points for the masking methods the background is of little
consequence, the points are placed to reflect the constructed fin
shape, including the entire fin in the texture file.
We have found that some trial and error is often required in obtaining
the texture points for the fins to give the best visual appearance.
Although more work can be done on Fixel and its user interface,
it is successful in aiding in the calculation of the texture points
required for VRFish.
The animation of the fish is divided into two sections. First there
is the animation of the fish form, which at this stage comprises only
the movement of the fins. The second section is the behaviour of the
fish which determines the way in which the fish moves around the environment.
This is achieved by implementing a simple flocking algorithm. Although
these two sections are discussed separately they are not mutually
exclusive in the rendering process: as fish move around the environment
they move their fins, producing a realistic swimming motion.
A very simple movement model for the fin motion has been implemented.
There is no deformation of the body area at this stage, although this
is theoretically possible, nor are the fins deformable. The only movement
is due to certain of the fins moving back and forth. The dorsal, adipose
and anal fins do not move at all in relation to the body (See Figure
7.1for a summary).
The caudal fin moves back and forth, up to a certain maximum angle,
we will call this maximum angle the movement angle of the fin. The
movement angle is specified by the user in the parameter file together
with a step value. The step value specifies how many degrees the fin
moves at a time.
The caudal fin is created at the origin and therefore can just be
rotated around the y-axis.
To rotate the pelvic fin one of the points in the fin is used to determine
the point about which it is to be rotated. The point which attaches
the fin to the body, and is the the furthest up the y axis is used.
The fin is translated so that this point is at the origin, then it
is rotated, and then it is translated back into position.
The pectoral fins are handled similarly, with the exception that the
point used is the one furthest out along the z-axis.
Although this is a very simple animation model, rotating the fins
back and forth produces a fish which appears to be swimming through
the water.
We want to achieve autonomous fish creatures. This means that the
swimming behaviour is not scripted. We use a basic flocking algorithm
based on Reynolds' flocking algorithm [15] and Conrad
Parker's [10] extension to the Reynolds flocking algorithm
as discussed in the chapter on related works.
To obtain the swimming behaviour we use the fish's current velocity
in conjunction with the three rules specified by Reynolds, namely:
When the VRSchool class adjusts the parameters in the information
objects it could vary the weightings by a small random amount to create
fish which have slightly different behaviour patterns.
To implement the rules, the fish has to obtain information about the
state and location of the other fish in the school. As has been already
been mentioned, GreatDane contains a database of the objects within
the environment. Each object is checked to see if it is the same species
of fish as the current fish. If the object is a fish of interest,
then the relevant properties of that fish can be used.
Each rule calculates a directional vector which is returned to the
``brain''. The brain uses the weightings specified in the parameter
text file to obtain a vector for each rule which is a certain proportion
of the vector originally calculated for the rule. These are added
together to obtain a final directional vector which is used to move
the fish.
All the rules use the state of the school, as perceived by the current
fish. Therefore the current fish's state is never included in the
results. Any distance between the fish is the distance between their
center points, not between the outside of the fish.
The method for the rules in greater detail follows:
The schooling algorithm uses Reynolds' flocking algorithm as a basis,
but implements a simplified version of his rules. To this we have
added a random path rule. These rules do not take the size of the
fish form into account. This means that the fish sometimes swim through
each other, most often seen when the fish are changing orientation.
This chapter presents a number of results. Firstly we discuss the
performance results and secondly the appearance. In the first section
on performance results we show the different factors which could influence
performance, namely level of detail, the different fish species and
the rendering method used for the fins. In the second section on appearance
we discuss the impact of the level of detail, present the different
species of fish we implemented, show the the visual appearance using
the different fin rendering methods and then finally we discuss the
schooling behaviour.
We have created a number of different fish species. (This means that
we have a number of different parameter files which the system can
read in.)
All tests were done on a Pentium III, 500MHz, 128MB RAM, with a Voodoo
5 graphics card, running Redhat Linux 7.2.
First we did some experiments to measure the performance of fish with
different levels of detail. There is one swimming fish within the
environment for these tests.
Figure 8.1 shows the performance of fish
with different levels of detail. The results are as expected: the
quality of the the 3D fish form certainly improves as the level of
detail gets higher, but the performance speed decreases. The lowest
level of detail, using BodySections = 8 and CircleSections = 6 has
a frame rate of over 85 frames per second. The fish with the highest
level of detail, in our experiment, using BodySections = 32 and CircleSections
= 24 has a frame rate of 21 frames per second. This is much higher
than the minimum frame rates required for a real-time system, (the
commonly accepted minimum real-time frame rate is about 10 frames
per second).
For the following experiments all fish are made up of 16 body sections,
each of which are divided into 12 points. The size, shape and placement
of the fins, urge weightings and initial velocity differ between fish
types. In these experiments there are no other virtual objects within
the system besides the fish.
Figure 8.2 shows the graph for the results
when comparing different fish species which have all been rendered
using the Alpha test method.
At the same level of detail, the differences in shape of fins, weightings
and initial velocity do not make a significant difference to the performance.
For the following experiments all fish are made up of 16 body sections,
each of which are divided into 12 points. The size, shape and placement
of the fins, urge weightings and initial velocity differ between fish
types. In these experiments there are no other virtual objects within
the system besides the fish.
Figure 8.3 shows the graph which comparing
the three different rendering techniques, using only the Bony bream
fish.
The different methods of rendering the fins do make a difference to
the performance speed. These results are as expected. The blending
method is a single pass rendering process ans so is very efficient.
The method using only the alpha test uses a two-pass rendering process
and therefore is slower than the blending process. The method using
the stencil and alpha test is a two-pass rendering process, and the
stencil buffer is cleared at each rendering making it slower than
the method using only the alpha test.
With ten fish in the environment, using the blending technique we
are obtaining a frame rate of just over 20 frames per second, double
the requirements for real-time. For the slowest method, using both
alpha and stencil test we are obtaining 10 frames per second, still
real-time.
Figure 8.4 shows the texture
files used. (a) is a scanned photo of a Monocentris Japonicus
(Pineapple fish) from J.L.B. Smith's Sea Fishes [18], and
(b) is a black and white version of the texture file.
The appearance is affected by the level of detail. With the simplest
level of detail used in the experiments, using BodySections = 8 and
CircleSections = 6, we obtain a very triangular fish body, with little
flexibility in the shape of the fins. The fins are placed on the true
curve and therefore there is a gap between the dorsal fin and the
body (see Figure 8.5 (a) ). But
simply doubling these values produces a rounded body, with a great
amount of fin shape flexibility and no gap between the dorsal fin
and the body.
Figure 8.6 shows a sample of all four
fish species created using the stencil and alpha tests.
Figure 8.7 is the end result for
the Pineapple fish created using VRFish, showing the 3 different
fin methods, with level of detail of BodySections = 16 and CircleSections
= 12.
The schooling behaviour which has been implemented is simple, but
produces a reasonably cohesive schooling behaviour pattern, with fish
fins animating as they move around the environment. The schooling
behaviour can be seen on the CD in the video clips directory or on
the web page (http://www.cs.ru.ac.za/research/g90f2972).
In this project we have taken the first step towards establishing
a library of objects which could be used by virtual reality programmers,
to create a world populated with interesting creatures and objects.
//any description ending with _T was used for testing
//description world_scale urgeFactor start_position_3D_point cubesize_t
bonybream 25.5 0.009 0.0 4.0 -9.3 10.0
//fish_colours_RGB
1.0 1.0 0.0
//fishshape_subclass BodySections CircleSections textured masked turn_T catchfish_T
FishShapeSin 16 12 true true false false
//Compression_ratio_of_fish_ body: scaleX scaleY scaleZ
0.26 0.1 0.04
//Caudal Fin
//top_line middle_line top_angel no._of_top_triangles connection_point_3d_point_x y z rotation_angle bottom_line bottom_angle no._of bottom_triangles movement_angle step_size
0.75 0.13 75.0 3.0 0.95 0.0 0.0 0.0 0.83 78.0 3.0 10.0 1.0
//adiposeFin
//startBodySection endBodySection startLength endLength startangle_in_degrees proportion
13.0 15.0 0.01 0.01 0.0 0.5
//dorsalFin
//startBodySection endBodySection startLength endLength startangle_in_degrees proportion
7.0 10.0 0.6 0.05 70.0 0.98
//pelvicFin
//startCircleSection startBodySection endBodySection start_length end_length end_angle movement_angle step_size
11.0 4.0 7.0 0.1 0.6 90.0 6.0 1.0
//analfin
startBodySection endBodySection startLength endLength startangle_in_degrees proportion
12.0 15.0 0.18 0.01 -55.0 0.9
//pectoralfin
//startBodySection startCircleSection no_of_triangles startLength startAngle proportion version_t
6.0 2.0 3.0 0.95 5.0 0.75 0.0 4.0 1.0
//texture_file_ name black_and_white_version_file_name
./textures/bonybream.gif ./textures/bbshape.gif
//texture point follow.
//number_of_ points_body_points
192
//bodySection_no. circleSection_no body_texture_points_2D
0 0 0.015625 0.3046875
0 1 0.015625 0.3046875
0 2 0.015625 0.3046875
0 3 0.015625 0.3046875
0 4 0.015625 0.3046875
0 5 0.015625 0.3046875
0 6 0.015625 0.3046875
0 7 0.015625 0.3046875
0 8 0.015625 0.3046875
0 9 0.015625 0.3046875
0 10 0.015625 0.3046875
0 11 0.015625 0.3046875
1 0 0.064453125 0.32421875
1 1 0.064453125 0.296875
1 2 0.064453125 0.26953125
1 3 0.064453125 0.23828125
1 4 0.064453125 0.26953125
1 5 0.064453125 0.296875
1 6 0.064453125 0.32421875
1 7 0.064453125 0.36328125
1 8 0.064453125 0.40234375
1 9 0.064453125 0.44140625
1 10 0.064453125 0.40234375
1 11 0.064453125 0.36328125
2 0 0.115234375 0.34375
2 1 0.115234375 0.3046875
2 2 0.115234375 0.265625
2 3 0.115234375 0.2265625
2 4 0.115234375 0.265625
2 5 0.115234375 0.3046875
2 6 0.115234375 0.34375
2 7 0.115234375 0.40234375
2 8 0.115234375 0.4609375
2 9 0.115234375 0.5234375
2 10 0.115234375 0.4609375
2 11 0.115234375 0.40234375
3 0 0.1640625 0.36328125
3 1 0.1640625 0.30859375
3 2 0.1640625 0.25
3 3 0.1640625 0.19140625
3 4 0.1640625 0.25 3
5 0.1640625 0.30859375
3 6 0.1640625 0.36328125
3 7 0.1640625 0.4453125
3 8 0.1640625 0.53125
3 9 0.1640625 0.6171875
3 10 0.1640625 0.53125
3 11 0.1640625 0.4453125
4 0 0.21484375 0.3828125
4 1 0.21484375 0.30859375
4 2 0.21484375 0.234375
4 3 0.21484375 0.15625
4 4 0.21484375 0.234375
4 5 0.21484375 0.30859375
4 6 0.21484375 0.3828125
4 7 0.21484375 0.484375
4 8 0.21484375 0.5859375
4 9 0.21484375 0.69140625
4 10 0.21484375 0.5859375
4 11 0.21484375 0.484375
5 0 0.263671875 0.40234375
5 1 0.263671875 0.3125
5 2 0.263671875 0.22265625
5 3 0.263671875 0.1328125
5 4 0.263671875 0.22265625
5 5 0.263671875 0.3125
5 6 0.263671875 0.40234375
5 7 0.263671875 0.51171875
5 8 0.263671875 0.625
5 9 0.263671875 0.73828125
5 10 0.263671875 0.625
5 11 0.263671875 0.51171875
6 0 0.314453125 0.421875
6 1 0.314453125 0.32421875
6 2 0.314453125 0.2265625
6 3 0.314453125 0.12890625
6 4 0.314453125 0.2265625
6 5 0.314453125 0.32421875
6 6 0.314453125 0.421875
6 7 0.314453125 0.53515625
6 8 0.314453125 0.65234375
6 9 0.314453125 0.76953125
6 10 0.314453125 0.65234375
6 11 0.314453125 0.53515625
7 0 0.36328125 0.44140625
7 1 0.36328125 0.33984375
7 2 0.36328125 0.23828125
7 3 0.36328125 0.1328125
7 4 0.36328125 0.23828125
7 5 0.36328125 0.33984375
7 6 0.36328125 0.44140625
7 7 0.36328125 0.55078125
7 8 0.36328125 0.66015625
7 9 0.36328125 0.7734375
7 10 0.36328125 0.66015625
7 11 0.36328125 0.55078125
8 0 0.4140625 0.4609375
8 1 0.4140625 0.359375
8 2 0.4140625 0.25390625
8 3 0.4140625 0.1484375
8 4 0.4140625 0.25390625
8 5 0.4140625 0.359375
8 6 0.4140625 0.4609375
8 7 0.4140625 0.5703125
8 8 0.4140625 0.6796875
8 9 0.4140625 0.7890625
8 10 0.4140625 0.6796875
8 11 0.4140625 0.5703125
9 0 0.462890625 0.48046875
9 1 0.462890625 0.38671875
9 2 0.462890625 0.2890625
9 3 0.462890625 0.19140625
9 4 0.462890625 0.2890625
9 5 0.462890625 0.38671875
9 6 0.462890625 0.48046875
9 7 0.462890625 0.58203125
9 8 0.462890625 0.68359375
9 9 0.462890625 0.78515625
9 10 0.462890625 0.68359375
9 11 0.462890625 0.58203125
10 0 0.513671875 0.5
10 1 0.513671875 0.41796875
10 2 0.513671875 0.3359375
10 3 0.513671875 0.25390625
10 4 0.513671875 0.3359375
10 5 0.513671875 0.41796875
10 6 0.513671875 0.5
10 7 0.513671875 0.59375
10 8 0.513671875 0.69140625
10 9 0.513671875 0.7890625
10 10 0.513671875 0.69140625
10 11 0.513671875 0.59375
11 0 0.5625 0.51953125
11 1 0.5625 0.44921875
11 2 0.5625 0.37890625
11 3 0.5625 0.30859375
11 4 0.5625 0.37890625
11 5 0.5625 0.44921875
11 6 0.5625 0.51953125
11 7 0.5625 0.59765625
11 8 0.5625 0.6796875
11 9 0.5625 0.76171875
11 10 0.5625 0.6796875
11 11 0.5625 0.59765625
12 0 0.61328125 0.5390625
12 1 0.61328125 0.48046875
12 2 0.61328125 0.421875
12 3 0.61328125 0.359375
12 4 0.61328125 0.421875
12 5 0.61328125 0.48046875
12 6 0.61328125 0.5390625
12 7 0.61328125 0.6015625
12 8 0.61328125 0.6640625
12 9 0.61328125 0.7265625
12 10 0.61328125 0.6640625
12 11 0.61328125 0.6015625
13 0 0.662109375 0.55859375
13 1 0.662109375 0.515625
13 2 0.662109375 0.46875
13 3 0.662109375 0.421875
13 4 0.662109375 0.46875
13 5 0.662109375 0.515625
13 6 0.662109375 0.55859375
13 7 0.662109375 0.59765625
13 8 0.662109375 0.63671875
13 9 0.662109375 0.6796875
13 10 0.662109375 0.63671875
13 11 0.662109375 0.59765625
14 0 0.712890625 0.578125
14 1 0.712890625 0.546875
14 2 0.712890625 0.515625
14 3 0.712890625 0.48046875
14 4 0.712890625 0.515625
14 5 0.712890625 0.546875
14 6 0.712890625 0.578125
14 7 0.712890625 0.6015625
14 8 0.712890625 0.625
14 9 0.712890625 0.65234375
14 10 0.712890625 0.625
14 11 0.712890625 0.6015625
15 0 0.763671875 0.59765625
15 1 0.763671875 0.59765625
15 2 0.763671875 0.59765625
15 3 0.763671875 0.59765625
15 4 0.763671875 0.59765625
15 5 0.763671875 0.59765625
15 6 0.763671875 0.59765625
15 7 0.763671875 0.59765625
15 8 0.763671875 0.59765625
15 9 0.763671875 0.59765625
15 10 0.763671875 0.59765625
15 11 0.763671875 0.59765625
//number_of_texture_points_for_caudal_fin
9
//texture_points_2D
0.708984375 0.57421875
0.99609375 0.4375
0.966796875 0.5234375
0.91015625 0.59765625
0.85546875 0.65234375
0.966796875 0.96484375
0.94140625 0.85546875
0.90625 0.74609375
0.85546875 0.65234375
//transparency_t
1.0
//no_of_dorsal_texture_points
8
//texture_points_2D
0.646484375 0.015625
0.404296875 0.1328125
0.552734375 0.29296875
0.57421875 0.23828125
0.455078125 0.1796875
0.501953125 0.2421875
0.64453125 0.015625
0.638671875 0.01953125
//no_of_adipose_texture_points
6
//texture_points_2D
0.619140625 0.046875
0.43359375 0.14453125
0.5390625 0.25390625
0.556640625 0.21875
0.48828125 0.203125
0.494140625 0.1953125
//no_of_anal_texture_points
8
//texture_points_2d
0.576171875 0.875
0.54296875 0.78515625
0.708984375 0.6640625
0.705078125 0.66796875
0.59765625 0.7421875
0.654296875 0.69921875
0.578125 0.85546875
0.5859375 0.84375
//no_of_pectoral_texture_points
7
//texture_points_2D
0.619140625 0.046875
0.431640625 0.14453125
0.546875 0.26171875
0.46875 0.18359375
0.509765625 0.2265625
0.61328125 0.0546875
0.607421875 0.0625
//no_of_pelvic_texture_points
8
//texture_points_2D
0.43359375 0.15234375
0.47265625 0.1953125
0.46484375 0.11328125
0.51171875 0.234375
0.548828125 0.26953125
0.521484375 0.07421875
0.583984375 0.046875
0.62109375 0.046875
//movement of fish
//initVelocity_vector
0.000009 0.0000075 0.0000071
//urge_weightings
//random center keepaway repelDistance speed changeRate direction
0.04 0.35 0.01 0.15 0.7 50.0 0.0015
//flee_info
0.04 10.0
Fixel is a program designed to aid in the obtaining of the texels
(texture points) for VRFish. Two copies of the texture are required.
The one used in VRFish should be the inverse of the one used in Fixel.(Fixel
uses the one with the correct orientation, VRFish uses a GIF which
is flipped. See Chapter 6.)
The Fixel window contains a menu bar at the top, this contains three
menus:
The File menu has three options, (FigureB.2
) Open - to open a picture file (GIF, JPG), Save - to save all points
that have been calculated into a text file with the extension .FXL
and the Exit option which will close the Fixel application.
The Values Menu (Figure B.2) has options
to allow the user to enter the relevant parameters that VRFish
will use when creating this particular fish. (Figure B.3
shows the value dialog boxes). For example Change Body Values displays
a dialog box where the user can input the number of body sections,
and the number of divisions at each of these are divided into (circle
sections / angular resolution). In order to create the caudal fin,
we need to know how many triangles are in the top half and how many
are in the bottom half. Similarly, in order to create the dorsal fin
we need to know the number of body sections the fin spans, and the
proportion parameter.
The Draw Menu (Figure B.2) has options
to start the process of each set of texture point calculation. Each
of these options sets the state of Fixel appropriately.
The texture file used by VRFish has to be a GIF file. But the file
for Fixel can be any picture format. (GIF, jpg etc). Click on the
File Menu. Select Open.
To do the Fixel (Fish Texel) points for the body follow these steps:
The structure is the same as the Dorsal fin
The structure is the same as the Dorsal fin but it is inverted.
Structure is the same as the dorsal fin The dorsal fin can be used
as the texture if the pectoral fin cannot be clearly seen
Once you have set all the texture points you require, you can save
these points to a text file with the extension FXL.
Below is a sample of a FXL file showing points for the Dorsal and
Anal fins. Each list of points is preceded by a comment to indicate
what the points are for, and on the following lines the number of
points there are for that specific structure.
14
0.228515625 0.00390625
0.13671875 0.31640625
0.396484375 0.328125
0.439453125 0.1796875
0.181640625 0.29296875
0.22265625 0.2890625
0.263671875 0.29296875
0.3125 0.30078125
0.353515625 0.30859375
0.2265625 0.01953125
0.23046875 0.02734375
0.234375 0.0390625
0.244140625 0.046875
0.25 0.05859375
//anal
8
0.40625 0.875
0.37890625 0.71875
0.5390625 0.65625
0.59765625 0.76171875
0.431640625 0.69921875
0.486328125 0.6796875
0.41015625 0.84765625
0.41796875 0.83203125
An UML type diagram to give an overview of the VRFish.
This document was generated using the
LaTeX2HTML translator Version 2K.1beta (1.47)
Copyright © 1993, 1994, 1995, 1996,
Nikos Drakos,
Computer Based Learning Unit, University of Leeds.
The command line arguments were:
The translation was initiated by Adele on 2002-11-10
for (j = 0; j < BodySections; j++) {
xj = j / (BodySections-1);
yj = sin(xj);
for (i = 0; i
To create the triangles the following algorithm is used:
p = 0
q = 0
for (j=0;j<(BodySections-1);j++){
for (i=0;i
Once the triangles have been created, a surface normal needs to be
calculated for each point to ensure correct lighting in OpenGL. For
a particular point all the surrounding triangles need to have their
surface normals calculated and then these surface normals are averaged
to get the surface normal at that point. To calculate the normal for
a triangle, two vectors are found tangent to the surface, the dot
product of these two vectors is perpendicular to both, and is therefore
perpendicular to the triangle. Two sides of the triangle are tangent
to the the surface [9] and are therefore used. It is a
good idea to normalize the resulting normal vector. Normalizing a
vector produces a vector parallel to the original, but of unit length.
[BodySections-8;CircleSections-6]
![\includegraphics[ scale=0.5]{pics/g86_1.eps}](../htmlpictures/g86_1.jpg)
[BodySections-8;CircleSections-8]
![\includegraphics[ scale=0.5]{pics/g88_1.eps}](../htmlpictures/g88_1.jpg)
[BodySections-16;CircleSections-12]
![\includegraphics[ scale=0.6]{pics/g1612_1.eps}](../htmlpictures/g1612_1.jpg)
[BodySections-32;CircleSections-24]
![\includegraphics[ scale=0.6]{pics/g3224_1.eps}](../htmlpictures/g3224_1.jpg)
[Body Length without scaling]
![\includegraphics[ scale=0.4]{pics/g86_1a.eps}](../htmlpictures/g86_1a.jpg) [Body Front without scaling]
[Body Front without scaling]
![\includegraphics[ scale=0.4]{pics/g86_2a.eps}](../htmlpictures/g86_2a.jpg)
[Body Length with scaling]
[Body Front with scaling]
![\includegraphics[ scale=0.5]{pics/g86_2.eps}](../htmlpictures/g86_2.jpg)
4.2 Fins
[Lampris guttatus (Spotted opah)]
![\includegraphics[ scale=0.3]{u117_1fix.eps}](../htmlpictures/u117_1fix.jpg)
[Beryx decadactylus(Beryx)]
![\includegraphics[ scale=0.25]{u126_1fix.eps}](../htmlpictures/u126_1fix.jpg)
[Monocentris Japonicus (Pineapple fish)]
![\includegraphics[ scale=0.25]{u128_1fix.eps}](../htmlpictures/u128_1fix.jpg)
4.2.1 Caudal Fin
[0.75; 0.13; 75.0; 3.0;0.83; 78.0; 3.0]
![\includegraphics[ scale=0.6]{pics/caudal1.eps}](../htmlpictures/caudal1.jpg)
[0.75; 0.77; 75.0; 3.0; 0.83; 78.0; 3.0]
![\includegraphics[ scale=0.6]{pics/caudal2.eps}](../htmlpictures/caudal2.jpg)
[0.75; 0.2; 75.0; 3.0; 0.9; 58.0; 3.0]
![\includegraphics[ scale=0.6]{pics/caudal3.eps}](../htmlpictures/caudal3.jpg)
[0.75; 0.2; 75.0; 5.0; 0.9;58.0; 5.0]
![\includegraphics[ scale=0.6]{pics/caudal4.eps}](../htmlpictures/caudal4.jpg)
[(0.95; 0.0; 0.0)]
![\includegraphics[ scale=0.4]{pics/caudal5.eps}](../htmlpictures/caudal5.jpg)
[(0.99; 0.0; 0.0)]
[(0.90; 0.0; 0.0)]
![\includegraphics[ scale=0.4]{pics/caudal7.eps}](../htmlpictures/caudal7.jpg)
4.2.2 Vertical Fins
[6.0; 16.0; 1.5; 0.05; 95.0;0.8]
![\includegraphics[ scale=0.6]{pics/dorsal1.eps}](../htmlpictures/dorsal1.jpg)
[6.0; 16.0; 1.5; 0.7; 95.0; 0.9]
![\includegraphics[ scale=0.6]{pics/dorsal2.eps}](../htmlpictures/dorsal2.jpg)
[6.0; 16.0; 1.0;0.05; 85.0; 0.6]
![\includegraphics[ scale=0.6]{pics/dorsal3.eps}](../htmlpictures/dorsal3.jpg)
4.2.3 Pectoral Fin
[10.0; 2.0; 6.0; 1.1; 30.0; 0.8]
[10.0; 2.0; 3.0;1.5; 30.0; 0.8]
[10.0; 2.0; 3.0;>1.0; 15.0; 0.8]
4.2.4 Pelvic Fin
[18.0; 8.0; 14.0;0.1; 0.6; 90.0]
![\includegraphics[ scale=0.7]{pics/pelvic1.eps}](../htmlpictures/pelvic1.jpg)
[18.0; 8.0; 14.0;0.5; 0.6; 90.0; ]
![\includegraphics[ scale=0.7]{pics/pelvic2.eps}](../htmlpictures/pelvic2.jpg)
[18.0; 8.0; 14.0;0.5; 0.0; 90.0; ]
![\includegraphics[ scale=0.7]{pics/pelvic3.eps}](../htmlpictures/pelvic3.jpg)
[18.0;8.0; 14.0;0.5; 0.1;90.0]
![\includegraphics[ scale=0.7]{pics/pelvic4.eps}](../htmlpictures/pelvic4.jpg)
[18.0; 8.0; 14.0; 0.1; 0.5; 0.8; 40.0]
![\includegraphics[ scale=0.7]{pics/pelvic5.eps}](../htmlpictures/pelvic5.jpg)
4.2.5 Parameter file
4.2.6 Schools
4.2.7 Summary
5. Rendering
5.1 Texturing
The algorithm used is as follows:
Load the texture
Enable texturing
Enable (GL_TEXTURE_2D);
Select the texture
BindTexture (GL_TEXTURE_2D, textureID);
Set the drawing mode so that the textured triangles are drawn using the colours from the texture map.
Use DECAL so that it overwrites the colour the surface was originally drawn in.
TexEnvf (GL_TEXTURE_ENV, GL_TEXTURE_ENV_MODE, GL_DECAL);
Enable Gouraud Shading by setting the ShadeModel to GL_SMOOTH
ShadeModel(GL_SMOOTH);
Draw the shape setting the texture coordinates, normals and vertices, in that order
TexCoord2f(tx,ty);
Normal3f(nx,ny,nz);
Vertex3f (x,y,z);
Disable the enabled modes to reset environment.
This texturing is adequate for the rendering of the body, but additional techniques are required for the rendering of the fins.
Fin rendering techniques
To achieve more interesting fins, we implemented and test differented rendering
techniques.
Blending
Our first method attempts to obtain semi-translucent fins.
To achieve this we use the blending function in OpenGL.
When setting the texture environmental variables in OpenGL we specify the
way in which the incoming texture colour must be combined with the colour
which is already there.
When using the MODULATE parameter, together with specifying the colours
of the texture in RGB mode, we obtain
colour_final = colour_texture * colour_fragment
alpha_final = alpha_texture * alpha_fragment
Since we are using RGB mode we need to set the alpha value, which we set
to 0.5.
If one attempts to use the RGBA mode for specifying the texture colours,
it influences the texturing of the body, and produces undesirable effects
in the rendering of the body. This is due to the fact that when using RGBA mode for the colour DECAL
uses the following formulae
colour_final = (1-alpha_texture)*Colour_fragment + alpha_texture*colour_texture
alpha_final = alpha_fragment
The algorithm used for blending is:
Set the alpha value to 0.5.
Set the texture environment values:
TexEnvf (GL_TEXTURE_ENV, GL_TEXTURE_ENV_MODE, GL_MODULATE);
Enable Blending and set the blending function to
BlendFunc(GL_ONE, GL_ONE_MINUS_SRC_ALPHA );
5.2 Fin rendering techniques
5.2.1 Blending
alpha_final = alpha_fragment
Set the alpha value to 0.5.
Set the texture environment values:
TexEnvf (GL_TEXTURE_ENV, GL_TEXTURE_ENV_MODE, GL_MODULATE);
Enable Blending and set the blending function to
BlendFunc(GL_ONE, GL_ONE_MINUS_SRC_ALPHA );
5.2.2 Non-triangular fin
5.2.2.1 Stencil Buffer
5.2.2.2 Alpha Test
algorithm here .. see pdf file
[Pelvic fin totally obscured]
![\includegraphics[ scale=0.45]{pics/ppmsk1circle.eps}](../htmlpictures/ppmsk1circle.jpg)
[Pelvic fin partially obscured]
![\includegraphics[ scale=0.5]{pics/ppmsk2circle.eps}](../htmlpictures/ppmsk2circle.jpg)
[Anal fin obscuring pelvic fin]
![\includegraphics[ scale=0.7]{pics/ppmsk3circle.eps}](../htmlpictures/ppmsk3circle.jpg) [Pelvic fin obscuring other fish]
[Pelvic fin obscuring other fish]
![\includegraphics[ scale=0.6]{pics/pp10msk1circle.eps}](../htmlpictures/pp10msk1circle.jpg)
[Pelvic fin obscuring other fish]
![\includegraphics[ scale=0.7]{pics/pp10msk2circle.eps}](../htmlpictures/pp10msk2circle.jpg)
5.2.3 Stencil test and alpha test
[Anal fin does not obscure pelvic fin]
![\includegraphics[ scale=0.6]{pics/pp1alst1circle.eps}](../htmlpictures/pp1alst1circle.jpg)
[Pelvic fin not obscuring other pelvic fin]
![\includegraphics[ scale=0.6]{pics/pp1alst2circle.eps}](../htmlpictures/pp1alst2circle.jpg)
[Pelvic fin not being obscured]
![\includegraphics[ scale=0.6]{pics/pp1alst3circle.eps}](../htmlpictures/pp1alst3circle.jpg)
[Fins not obscuring other fish]
![\includegraphics[ scale=0.6]{alsfin.eps}](../htmlpictures/alsfin.jpg)
[Fish not being obscured by other fins]
![\includegraphics[ scale=0.6]{pics/pp10alst.eps}](../htmlpictures/pp10alst.jpg)
5.3 Summary
6. Fixel
7. Animation
7.1 Fin Motion
7.2 Behaviour
and a fourth rule which involves the following of a random path, created
using a spline. This random path rule allows the single fish in isolation
to swim on a random path in the virtual reality environment, but as
soon as there are other fish species present, the schooling behaviour
manifests. Each rule is weighted differently to create the final direction
the fish moves in. These weightings are stored in the parameter text
file. Although the weightings reflect the importance of the rule,
they are determined using a trial and error method. One of the reasons
for this is that the rules do not take into account the fish's size,
and therefore if one changes the size of the fish, the weighting values
often have to be adjusted slightly to obtain the correct visual effect.
7.3 Summary
8. Results
8.1 Performance
8.1.1 Level of Detail
8.1.2 Different species
8.1.3 Fin rendering techniques
8.2 Appearance
8.2.1 Level of detail
[BodySections-8; CircleSections-6]
![\includegraphics[ scale=0.4]{pics/pp86.eps}](../htmlpictures/pp86.jpg)
[BodySections-16; CircleSections-12]
![\includegraphics[ scale=0.4]{pics/pp1612.eps}](../htmlpictures/pp1612.jpg)
[BodySections-8;CircleSections-6]
![\includegraphics[ scale=0.7]{pics/pp86b.eps}](../htmlpictures/pp86b.jpg)
[BodySections-16;CircleSections-12]
![\includegraphics[ scale=0.7]{pics/pp1612b.eps}](../htmlpictures/pp1612b.jpg)
8.2.2 Different Species
[Pineapple fish]
![\includegraphics[ scale=0.5]{pics/ppalst0.eps}](../htmlpictures/ppalst0.jpg)
[Bonybream fish]
![\includegraphics[ scale=0.6]{pics/bbalst1.eps}](../htmlpictures/bbalst1.jpg)
[Centroberyx fish]
![\includegraphics[ scale=0.6]{pics/cealst1.eps}](../htmlpictures/cealst1.jpg)
[Threadfin Goldie fish]
![\includegraphics[ scale=0.6]{pics/tfalst1.eps}](../htmlpictures/tfalst1.jpg)
8.2.3 Fin rendering techniques
[Blended fins]
![\includegraphics[ scale=0.5]{pics/ppbl1_6flip.eps}](../htmlpictures/ppbl1_6flip.jpg) [Using Alpha test only]
[Using Alpha test only]
![\includegraphics[ scale=0.5]{pics/ppmsk1.eps}](../htmlpictures/ppmsk1.jpg)
[Using Stencil and Alpha tests]
![\includegraphics[ scale=0.6]{pics/pp1alst2.eps}](../htmlpictures/pp1alst2.jpg)
8.2.4 Schooling behaviour
9. Conclusions
We have succeeded in creating a fish model which is self contained
and can be used with ease by virtual reality programmers to create
diverse and interesting underwater environments.
Bibliography
Available: http://nehe.gamedev.net/tutorials/Lesson20.asp [Accessed
on 12 December 2001].
Available : http://www.vergenet.net/Conrad/Boids/
[Accessed on 2 November 2001].
Available: http://www.touregypt.net/vdc/Rsfish.html, [Accessed on
3 September 2002].
A. Format of parameter file: BonyBream.txt
B. Fixel user manual
B.1 Introduction
The center will contain the texture file. At the bottom of the window
is the Instruction Bar. This contains context sensitive instructions
to aid you with the next step. These are not step-by-step instructions
but hints to help with ease of use. See Figure B.1
B.2 Open a texture file.
B.3 Body
The first requirement is the number of divisions the body will be
divided into. The 2nd requirement is the number of points each section
will be divided into when it is rotated to obtain the body. Click
in the Body Sections box , delete the current value, and enter the
new value. Click in the Circle sections box (or press tab). Delete
the current value and enter the new value. Once these are correct
click the OK button.
B.4 Caudal fin
Requirement: The number of triangles in the top half, and the bottom
half of the tail
B.5 Dorsal fin
The values required: The number of body sections that the dorsal fin
will span (in the Figure B.7 span is 4).
The proportion the next triangle's third point is placed on the side
of the triangle.
B.6 Adipose fin
B.7 Anal fin
B.8 Pectoral fin
B.9 Pelvic fin
B.10 Save file
C. UML Diagram
About this document ...
Copyright © 1997, 1998, 1999,
Ross Moore,
Mathematics Department, Macquarie University, Sydney.
latex2html -no_subdir -split 0 -show_section_numbers /tmp/lyx_tmpdir2949Sy3AtS/lyx_tmpbuf0/writeup.tex
![]()
![]()
![]()
Adele
2002-11-10
![\includegraphics[ scale=0.5]{hawkgraph.eps}](../htmlpictures/hawkgraph.jpg) [Hawk Fish]
[Hawk Fish]
![\includegraphics[ scale=0.4]{Hawkfish.ps}](../htmlpictures/hawkfish.jpg)
![\includegraphics[ scale=0.4]{pics/angelfishgraph.eps}](../htmlpictures/angelfishgraph.jpg) [Angel Fish]
[Angel Fish]
![\includegraphics[ scale=0.4]{angelfish.ps}](../htmlpictures/angelfish.jpg)
![\includegraphics[ width=0.35\paperwidth,
keepaspectratio]{bodytriangles.eps}](../htmlpictures/bodytriangles.jpg)
![\includegraphics[ width=0.35\paperwidth,
keepaspectratio]{bodynormals.eps}](../htmlpictures/bodynormals.jpg)
![\includegraphics[ scale=0.5]{pics/fishstructure.eps}](../htmlpictures/fishstructure.jpg)
![\includegraphics[ scale=0.4]{caudalfin.eps}](../htmlpictures/caudalfin.jpg)
![\includegraphics[ width=0.40\paperwidth,
keepaspectratio]{fintriangles2.eps}](../htmlpictures/fintriangles2.jpg)
![\includegraphics[ width=0.40\paperwidth,
keepaspectratio]{pics/pectoralfin.eps}](../htmlpictures/pectoralfin.jpg)
![\includegraphics[ width=0.40\paperwidth,
keepaspectratio]{pics/pelvicfin.eps}](../htmlpictures/pelvicfin.jpg)
![\includegraphics[ scale=0.6]{pics/complete.eps}](../htmlpictures/complete.jpg)
![\includegraphics[ scale=0.6]{pics/bbbl1_4.eps}](../htmlpictures/bbbl1_4.jpg) [Pineapple fish]
[Pineapple fish]
![\includegraphics[ scale=0.5]{pics/ppbl1_6.eps}](../htmlpictures/ppbl1_6.jpg)
![\includegraphics[ width=0.50\paperwidth,
keepaspectratio]{pics/fixel.eps}](../htmlpictures/fixel.jpg)
![\includegraphics[ width=0.35\paperwidth,
keepaspectratio]{pics/finemovement.eps}](../htmlpictures/finemovement.jpg)
![\includegraphics[ width=0.70\paperwidth,
keepaspectratio]{pics/levels.eps}](../htmlpictures/levels.jpg)
![\includegraphics[ width=0.70\paperwidth,
keepaspectratio]{pics/species.eps}](../htmlpictures/species.jpg)
![\includegraphics[ width=0.70\paperwidth,
keepaspectratio]{pics/methods.eps}](../htmlpictures/methods.jpg)
![\includegraphics[ scale=0.45]{bwpineapple.ps}](../htmlpictures/bwpineapple.jpg)
![\includegraphics[ width=0.50\paperwidth,
keepaspectratio]{/tmp/lyx_tmpdir2949Sy3AtS/lyx_tmpbuf0/pics_fixelwindowlabeled}](../htmlpictures/fixelwindowlabeled.jpg)
![\includegraphics[ scale=0.7]{screen02.eps}](../htmlpictures/screen02.jpg) [Values Menu]
[Values Menu]
![\includegraphics[ scale=0.7]{screen03.eps}](../htmlpictures/screen03.jpg) [Draw Menu]
[Draw Menu]
![\includegraphics[ scale=0.7]{screen04.eps}](../htmlpictures/screen04.jpg)
![\includegraphics[ scale=0.4]{screen05.eps}](../htmlpictures/screen05.jpg) [Caudal Values]
[Caudal Values]
![\includegraphics[ scale=0.45]{screen06.eps}](../htmlpictures/screen06.jpg) [Pelvic Values]
[Pelvic Values]
![\includegraphics[ scale=0.45]{screen11.eps}](../htmlpictures/screen11.jpg)
![\includegraphics[ width=0.50\paperwidth,
keepaspectratio]{screen15.eps}](../htmlpictures/screen15.jpg)
![\includegraphics[ width=0.50\paperwidth,
keepaspectratio]{screen18.eps}](../htmlpictures/screen18.jpg)
![\includegraphics[ width=0.35\paperwidth,
keepaspectratio]{pics/cadualfinmanual.eps}](../htmlpictures/cadualfinmanual.jpg)
![\includegraphics[ scale=0.7]{pics/dorsalman.eps}](../htmlpictures/dorsalman.jpg)
![\includegraphics[ scale=0.7]{pics/analfinman.eps}](../htmlpictures/analfinman.jpg)
![\includegraphics[ scale=0.6]{pics/pelvicfinman.eps}](../htmlpictures/pelvicfinman.jpg)
![\includegraphics[ width=0.60\paperwidth,
keepaspectratio]{pics/uml.eps}](../htmlpictures/uml.jpg)