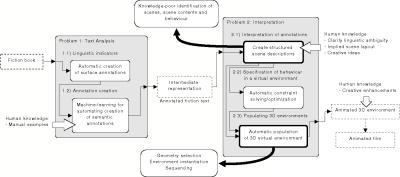
Figure 6.2: Illustration of the constraint creation and scene creation modules in the fiction-to-animation process.
1452 x 643
(31 KB)

Figure 6.3: Illustration of the interpretation module for creating constraints from annotated fiction text.
1628 x 426
(25 KB)
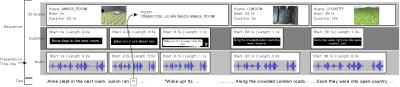
Figure 6.7: Illustration of the relationship between the presentation time-line and behaviour in a 3D virtual environment.
1889 x 413
(8001 KB)
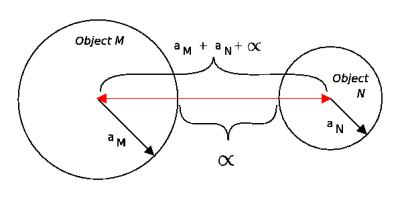
Figure 6.8: Illustration of the spatial relationship described by the near constraint.
597 x 305
(22 KB)
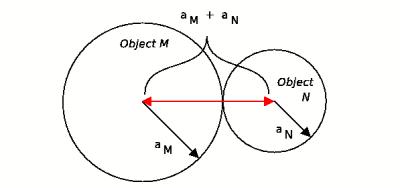
Figure 6.9: Illustration of the spatial relationship described by the noCollide constraint.
597 x 282
(19 KB)
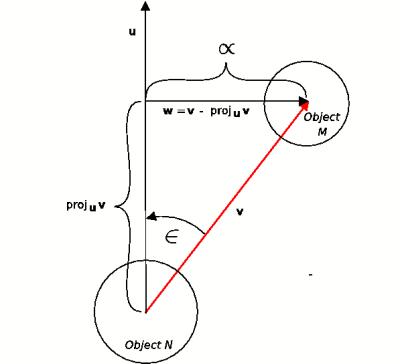
Figure 6.10: Illustration of the spatial relationship described by the directionRelation constraint.
597 x 544
(24 KB)
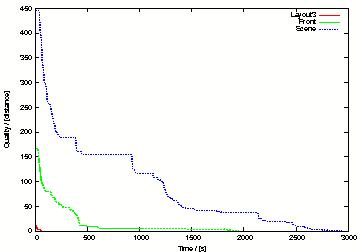
Figure 6.11: Quality of intermediate solutions to benchmarks (without motion) as a function of execution time.
360 x 252
(19 KB)
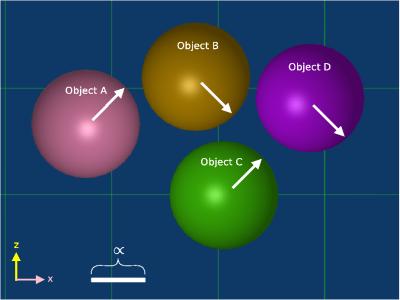
Figure 6.12(a): Solutions to Front and Scene benchmarks depicted graphically - Front.
925 x 694
(2834 KB)
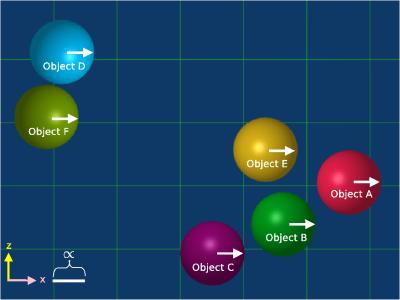
Figure 6.12(b): Solutions to Front and Scene benchmarks depicted graphically - Scene.
925 x 694
(2842 KB)
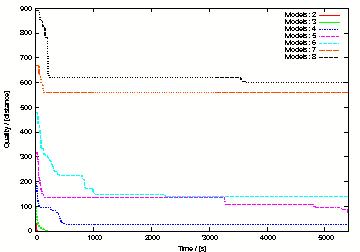
Figure 6.13: Quality of approximate solutions to inconsistent constraint systems as a function of execution time.
360 x 252
(33 KB)
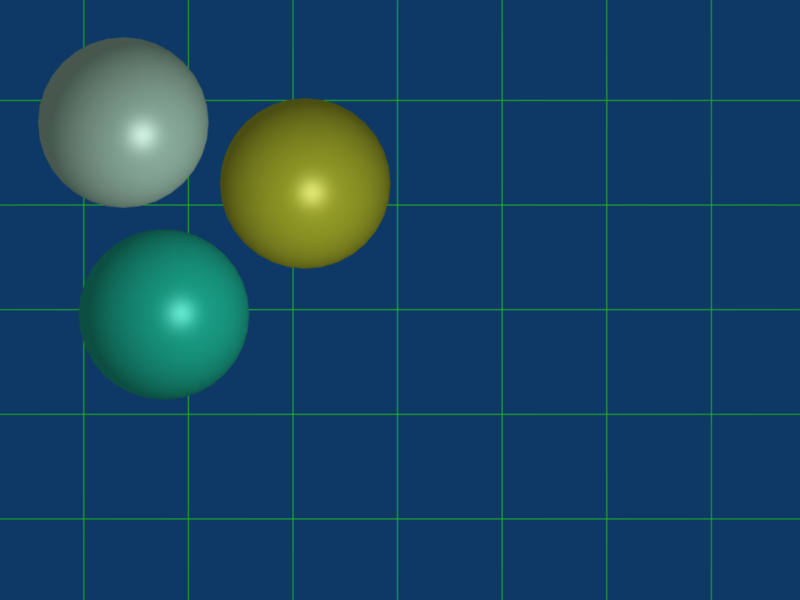
Figure 6.14(a): Visualization of approximate solutions to inconsistent constraint systems - 3 Models (consistent): Quality = 0.
800 x 600
(55 KB)
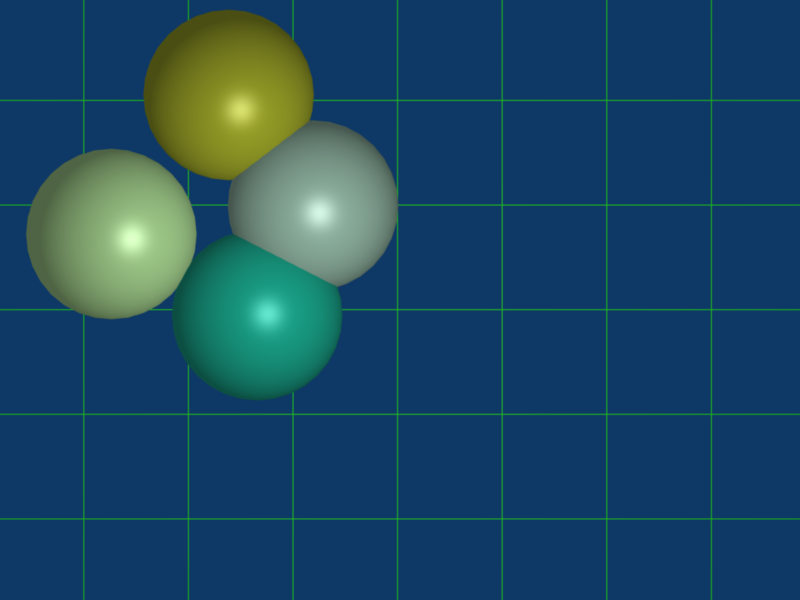
Figure 6.14(b): Visualization of approximate solutions to inconsistent constraint systems - 4 Models: Quality = 101.23.
800 x 600
(67 KB)
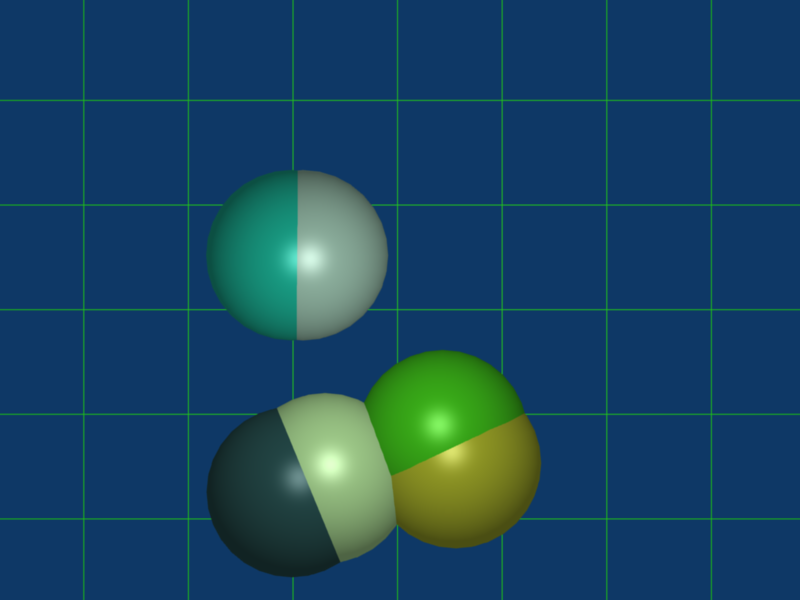
Figure 6.14(c): Visualization of approximate solutions to inconsistent constraint systems - 6 Models: Quality = 138.71.
800 x 600
(62 KB)
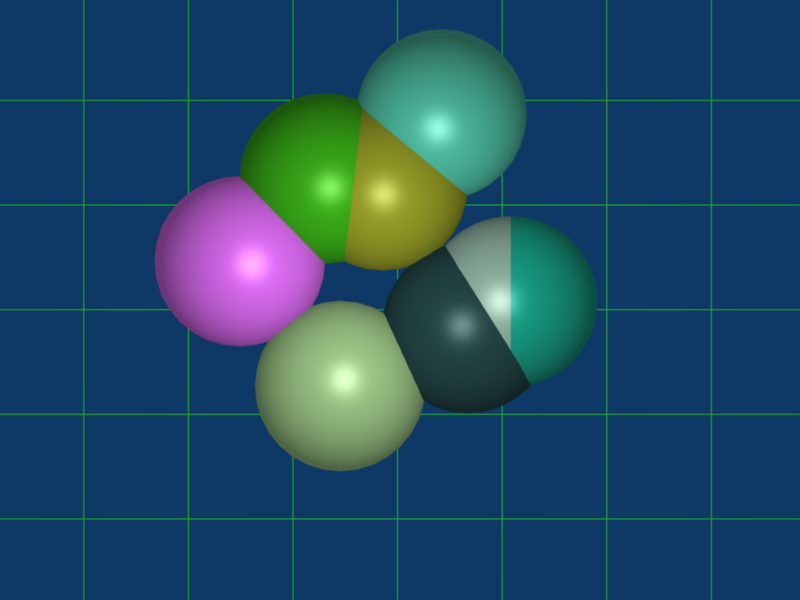
Figure 6.14(d): Visualization of approximate solutions to inconsistent constraint systems - 8 Models: Quality = 599.04.
800 x 600
(90 KB)
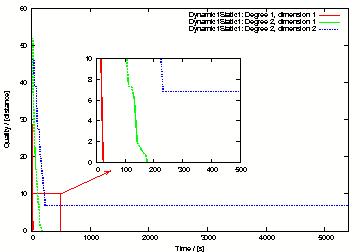
Figure 6.15: Quality of intermediate solutions to the Dynamic1Static1 benchmark as a function of execution time.
360 x 252
(17 KB)
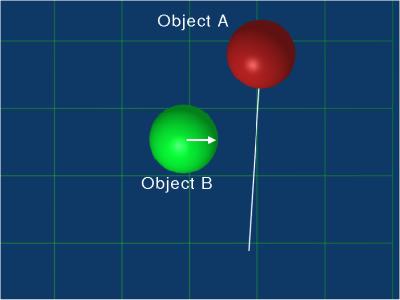
Figure 6.16(a): Visualization of the solution to the Dynamic1Static1 benchmark using a trajectory of degree 1 - 0 seconds.
767 x 576
(2823 KB)
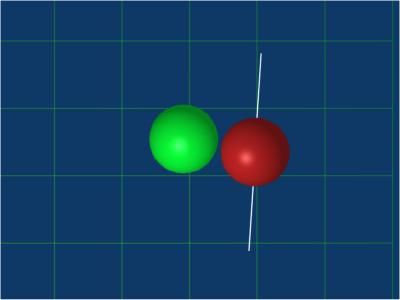
Figure 6.16(b): Visualization of the solution to the Dynamic1Static1 benchmark using a trajectory of degree 1 - 5 seconds.
767 x 576
(2823 KB)
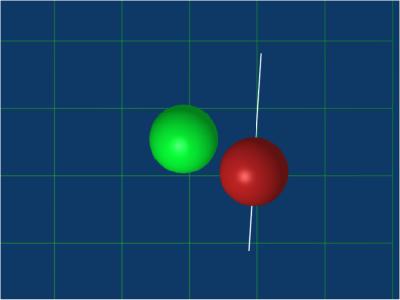
Figure 6.16(c): Visualization of the solution to the Dynamic1Static1 benchmark using a trajectory of degree 1 - 6 seconds.
767 x 576
(2823 KB)
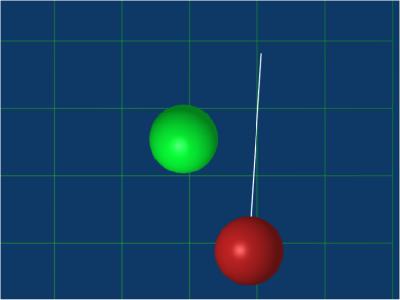
Figure 6.16(d): Visualization of the solution to the Dynamic1Static1 benchmark using a trajectory of degree 1 - 10 seconds.
767 x 576
(2823 KB)
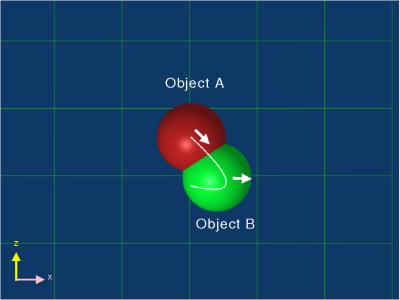
Figure 6.17(a): Visualization of the approximate solution to the Dynamic1Static1 benchmark using a trajectory of degree 2 - 0 seconds.
925 x 694
(2824 KB)
Figure 6.17(b): Visualization of the approximate solution to the Dynamic1Static1 benchmark using a trajectory of degree 2 - 5 seconds.
800 x 600
(23 KB)
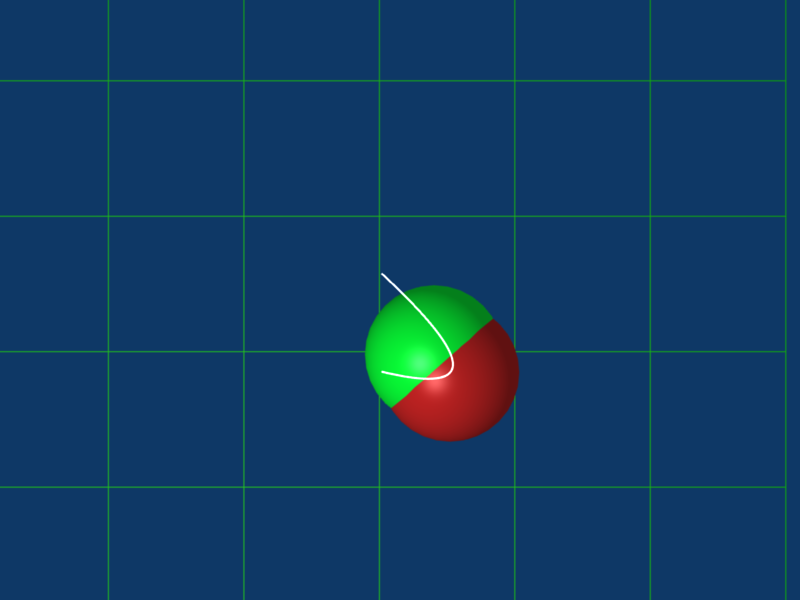
Figure 6.17(c): Visualization of the approximate solution to the Dynamic1Static1 benchmark using a trajectory of degree 2 - 6 seconds.
800 x 600
(24 KB)
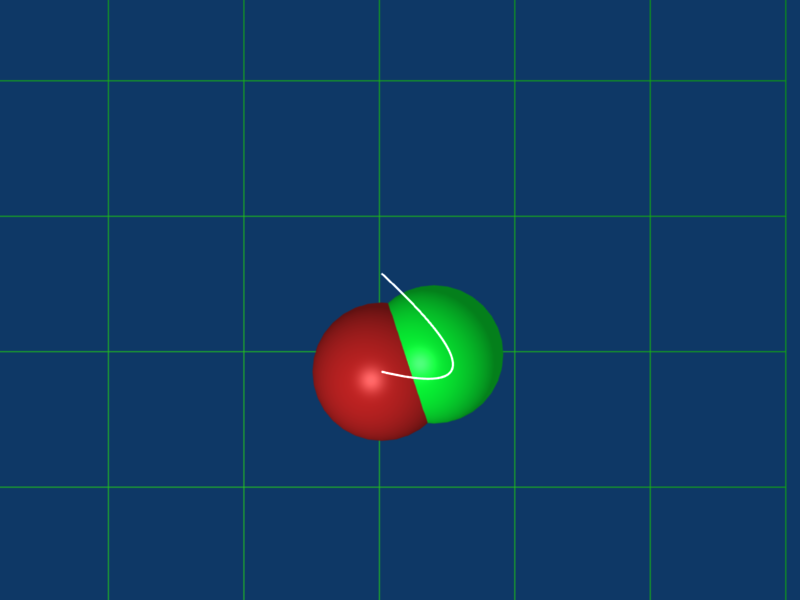
Figure 6.17(d): Visualization of the approximate solution to the Dynamic1Static1 benchmark using a trajectory of degree 2 - 10 seconds.
800 x 600
(27 KB)
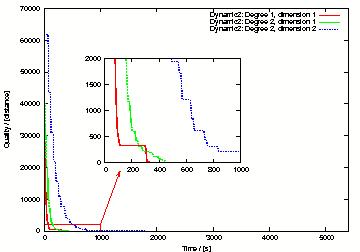
Figure 6.18: Quality of intermediate solutions to the Dynamic2 benchmark as a function of execution time.
360 x 252
(19 KB)
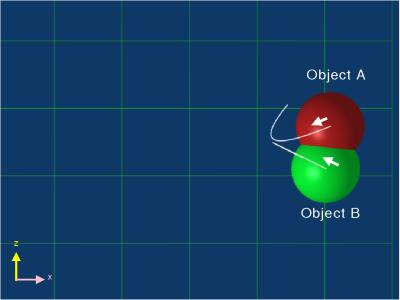
Figure 6.19(a): Visualization of approximate solutions of increasing quality for the Dynamic2 benchmark - 0 seconds.
925 x 694
(2824 KB)
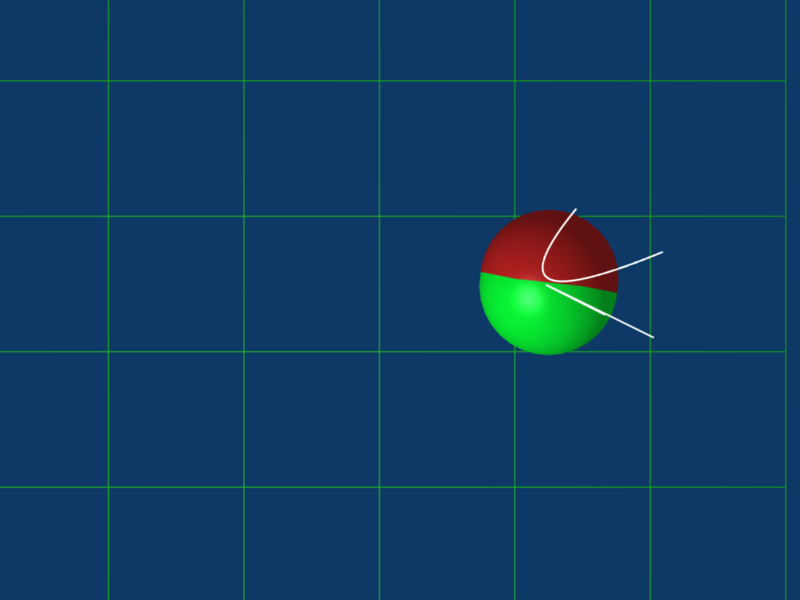
Figure 6.19(a): Visualization of approximate solutions of increasing quality for the Dynamic2 benchmark - 5 seconds.
800 x 600
(24 KB)
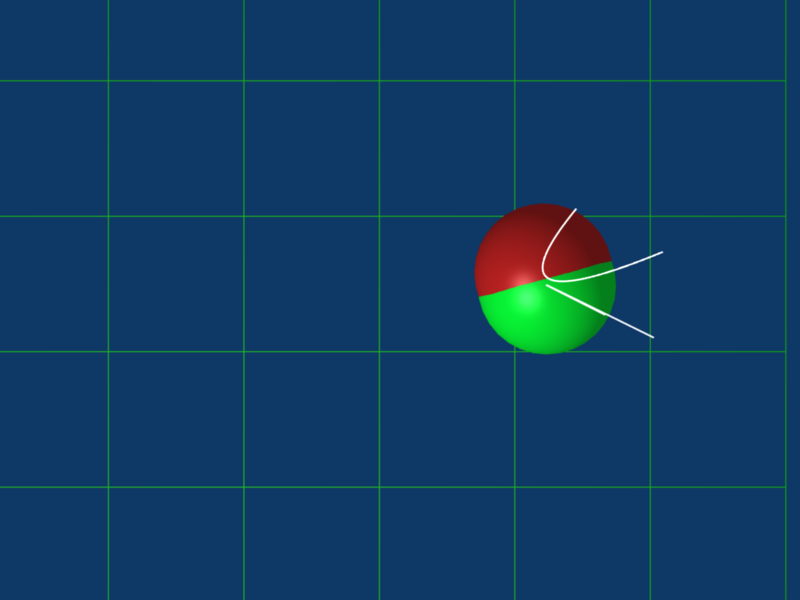
Figure 6.19(a): Visualization of approximate solutions of increasing quality for the Dynamic2 benchmark - 6 seconds.
800 x 600
(24 KB)
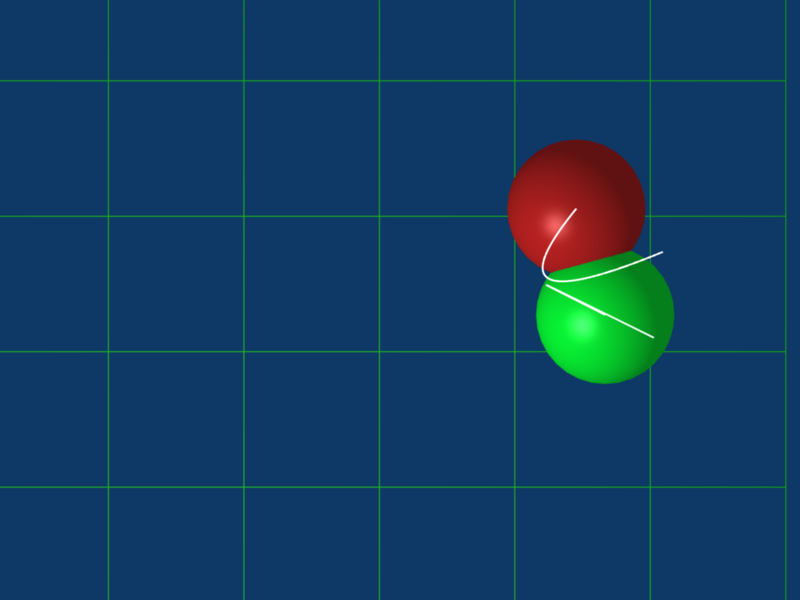
Figure 6.19(a): Visualization of approximate solutions of increasing quality for the Dynamic2 benchmark - 10 seconds.
800 x 600
(31 KB)
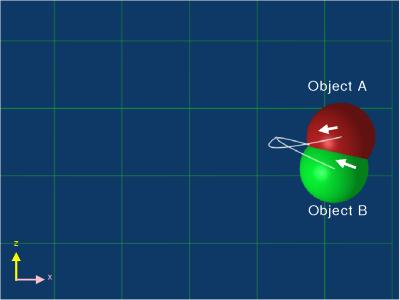
Figure 6.19(a): Visualization of approximate solutions of increasing quality for the Dynamic2 benchmark - 0 seconds.
925 x 694
(2824 KB)
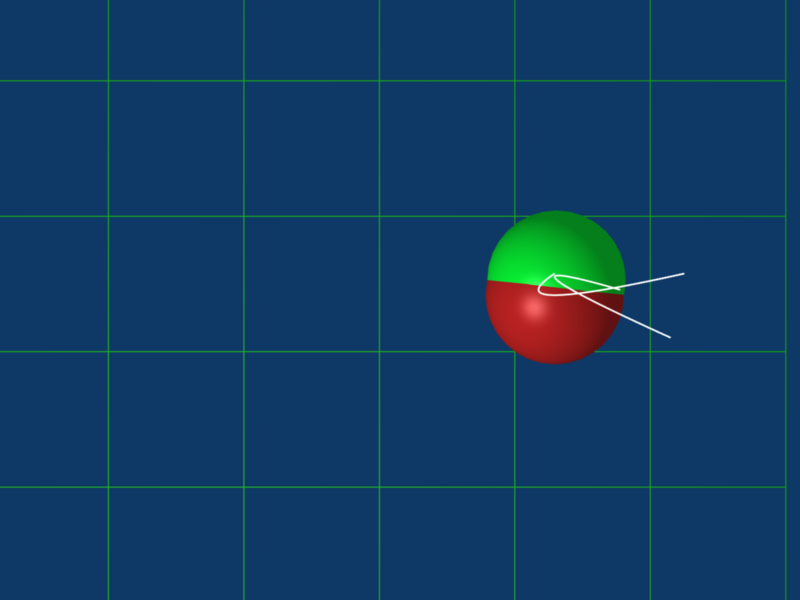
Figure 6.19(a): Visualization of approximate solutions of increasing quality for the Dynamic2 benchmark - 5 seconds.
800 x 600
(24 KB)
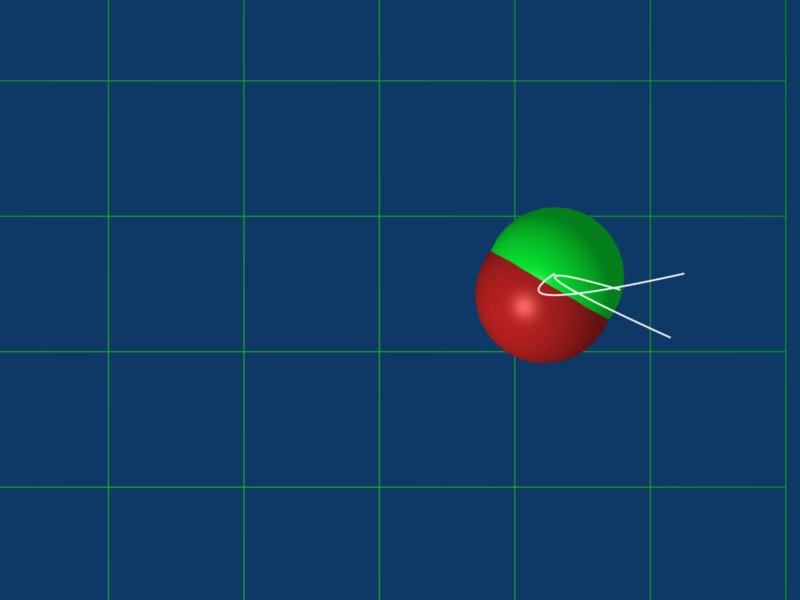
Figure 6.19(a): Visualization of approximate solutions of increasing quality for the Dynamic2 benchmark - 6 seconds.
800 x 600
(25 KB)
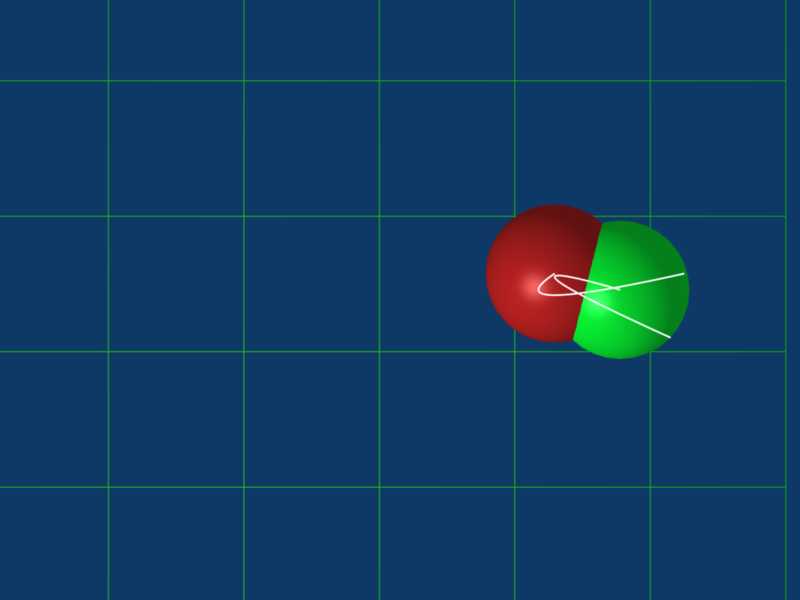
Figure 6.19(a): Visualization of approximate solutions of increasing quality for the Dynamic2 benchmark - 10 seconds.
800 x 600
(28 KB)
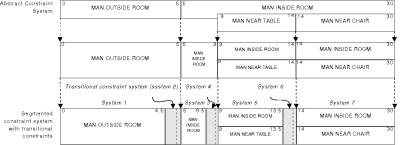
Figure 6.20: Illustration of constraint system segmentation.
1210 x 441
(27 KB)
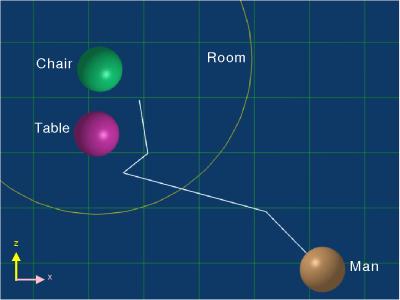
Figure 6.21(a): Visualization of a complex trajectory as the sequence of low degree trajectories - 5 seconds.
925 x 694
(2824 KB)
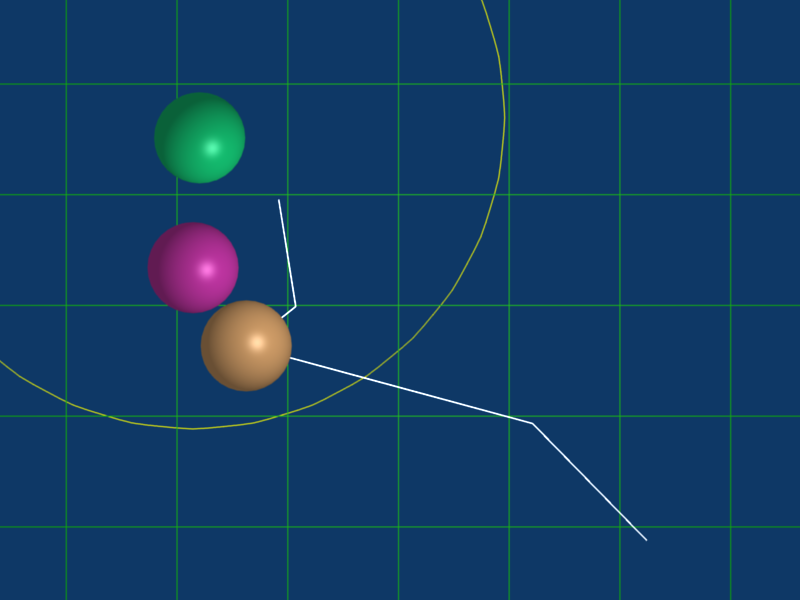
Figure 6.21(b): Visualization of a complex trajectory as the sequence of low degree trajectories - 8 seconds.
800 x 600
(46 KB)
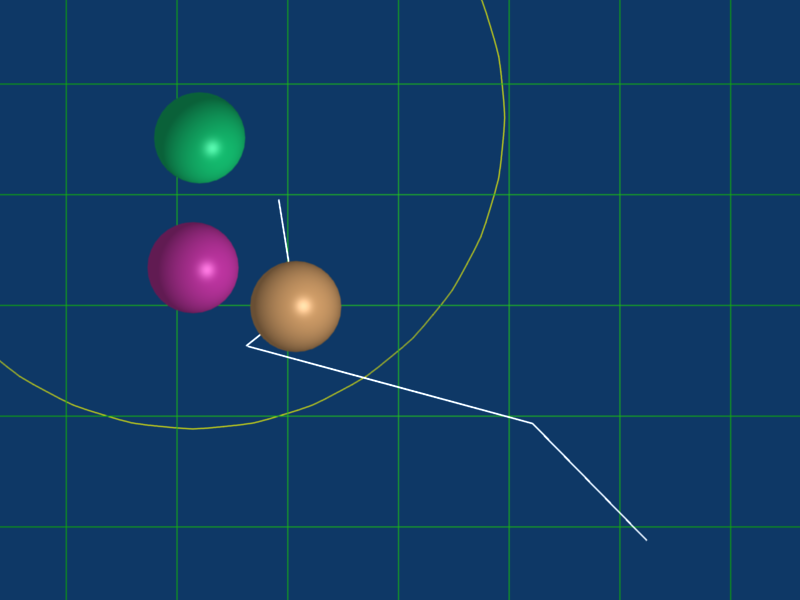
Figure 6.21(c): Visualization of a complex trajectory as the sequence of low degree trajectories - 12 seconds.
800 x 600
(47 KB)
Figure 6.21(d): Visualization of a complex trajectory as the sequence of low degree trajectories - 18 seconds.
800 x 600
(47 KB)
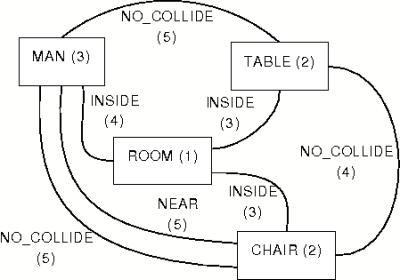
Figure 6.22(a): Illustration of incremental system optimization - Constraint system illustrated as a weighted graph.
.
449 x 315
(14 KB)
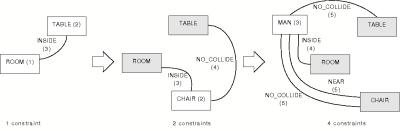
Figure 6.22(b): Illustration of incremental system optimization - Three incrementally solved constraint systems.
1122 x 369
(18 KB)
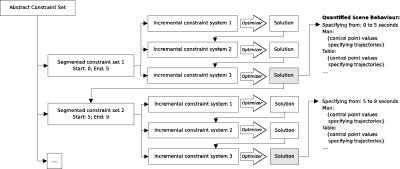
Figure 6.23: Illustration of the process used to create quantified trajectories from an abstract constraint set.
1372 x 581
(339 KB)

Figure 6.24: Default humanoid model from the library with orientation, location and bounding box illustrated.
328 x 546
(63 KB)
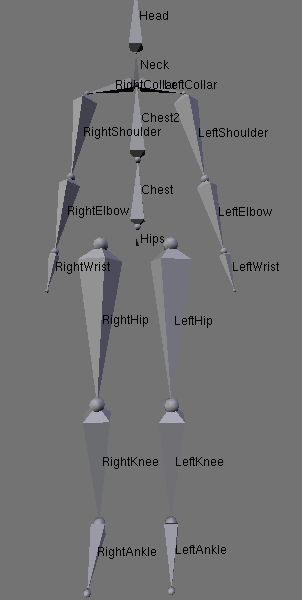
Figure 6.25(a): Armature configuration and illustration of the default avatar in the three standard poses - Rest position.
302 x 600
(11 KB)
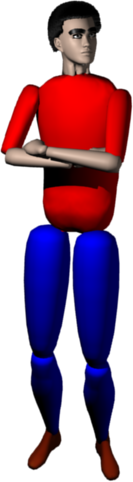
Figure 6.25(b): Armature configuration and illustration of the default avatar in the three standard poses - Stand pose.
133 x 482
(34 KB)
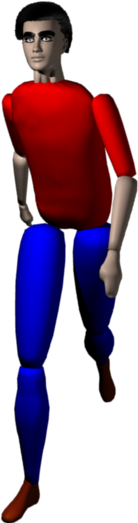
Figure 6.25(c): Armature configuration and illustration of the default avatar in the three standard poses - Walk pose.
138 x 523
(35 KB)
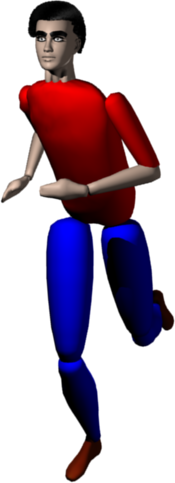
Figure 6.25(d): Armature configuration and illustration of the default avatar in the three standard poses - Run pose.
175 x 483
(35 KB)
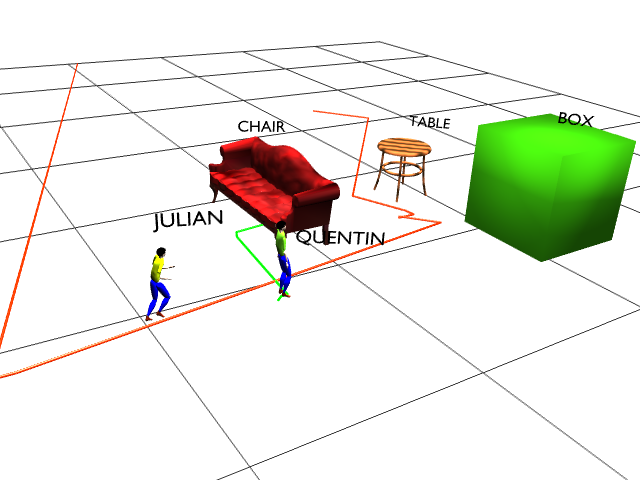
Figure 6.26: Illustration of a 3D environment containing models with assigned motion and articulation.
640 x 480
(57 KB)
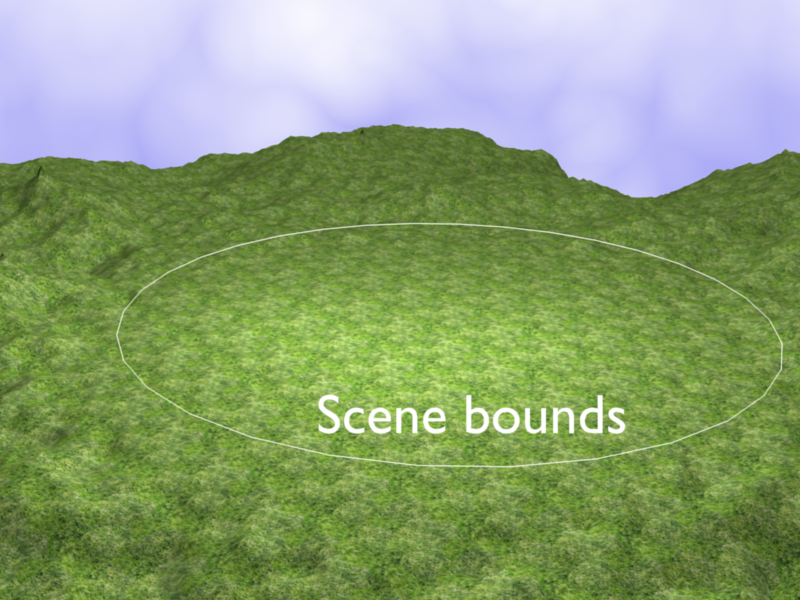
Figure 6.27(a): Example settings generated procedurally - Terrain.
800 x 600
(634 KB)
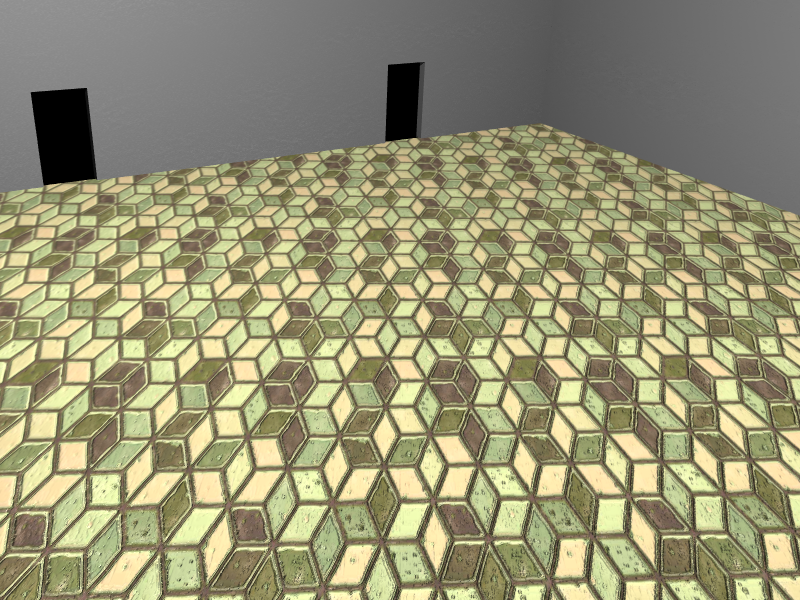
Figure 6.27(b): Example settings generated procedurally - Room.
800 x 600
(806 KB)
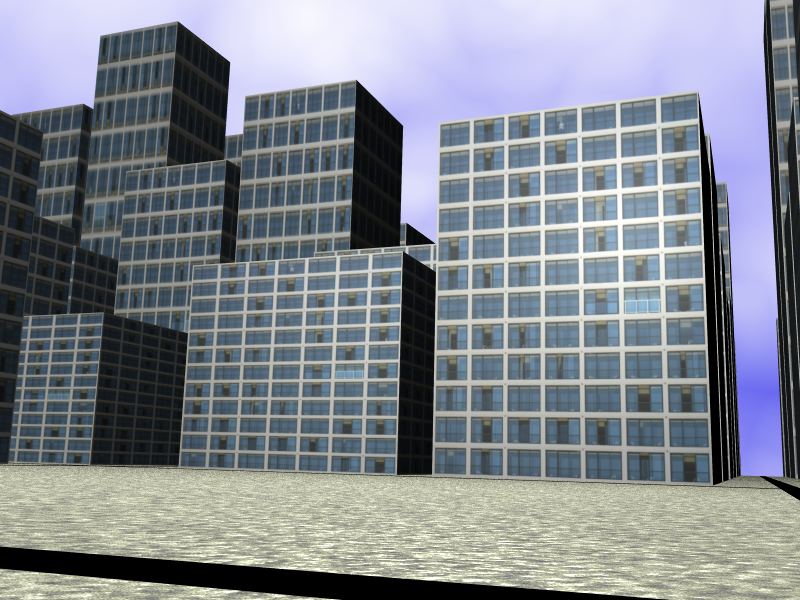
Figure 6.27(c): Example settings generated procedurally - City.
800 x 600
(590 KB)

Figure 6.29: Example subtitle with speech bubble, representing a quote from talking avatar Julian.
623 x 126
(9 KB)
Figure 6.30: Example sequence in Blender constructed automatically from the Famous Five 1: Five on a Treasure Island by Enid Blyton (1942).
799 x 373
(14 KB)
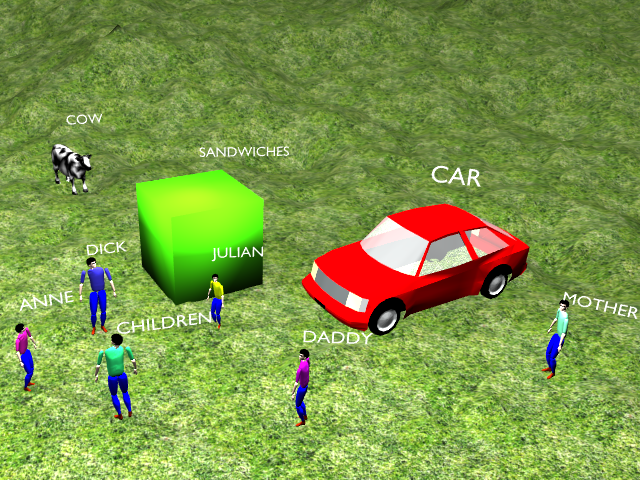
Figure 6.31(a): Illustration of automatically generated virtual environment without manual intervention - Extract 1.
640 x 480
(621 KB)
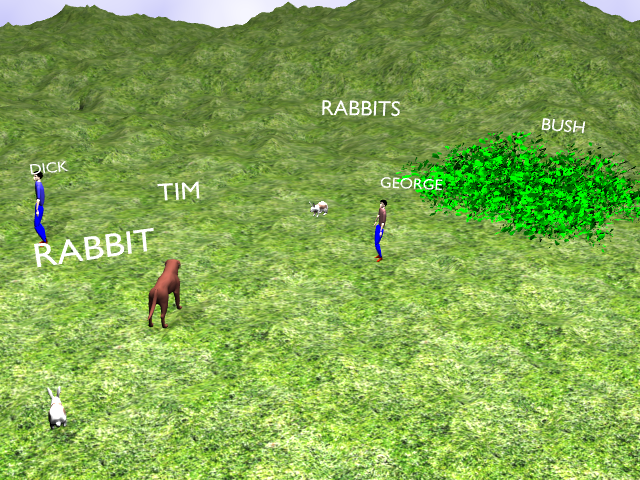
Figure 6.31(b): Illustration of automatically generated virtual environment without manual intervention - Extract 2.
640 x 480
(661 KB)
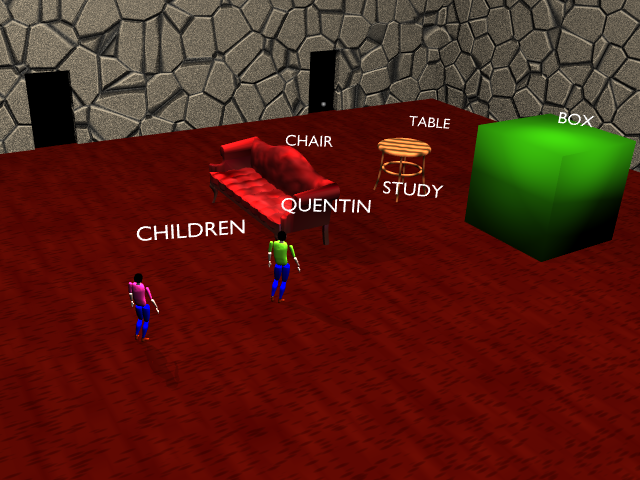
Figure 6.31(c): Illustration of automatically generated virtual environment without manual intervention - Extract 3.
640 x 480
(370 KB)
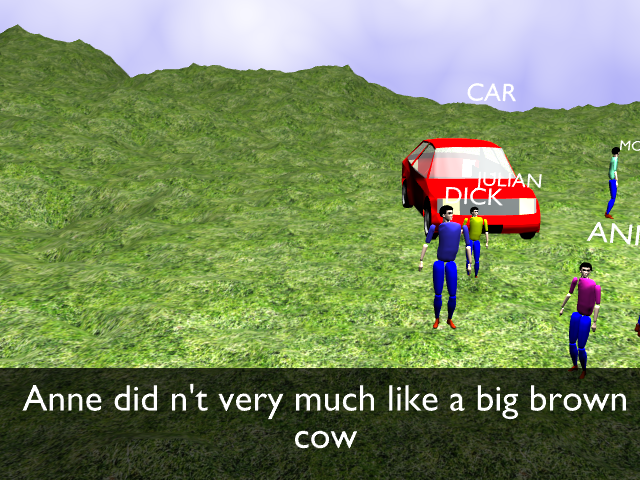
Figure 6.32(a): Cow scene from the Famous Five 1: Five on a Treasure Island by Enid Blyton (1942).
640 x 480
(534 KB)
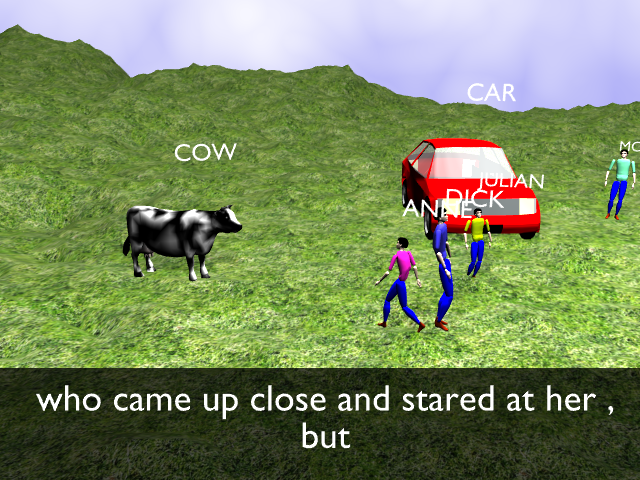
Figure 6.32(b): Cow scene from the Famous Five 1: Five on a Treasure Island by Enid Blyton (1942).
640 x 480
(534 KB)
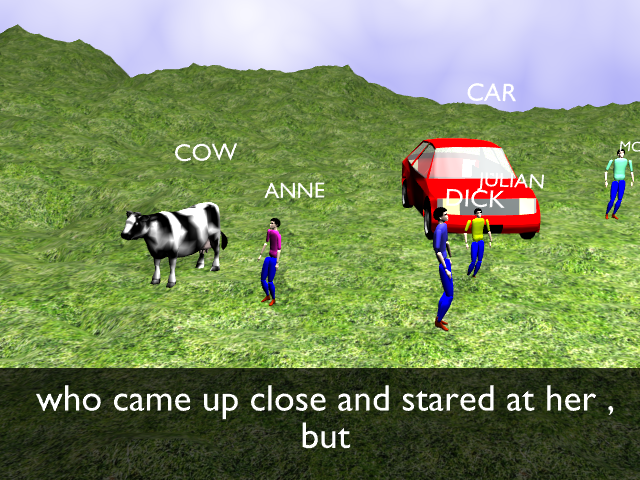
Figure 6.32(c): Cow scene from the Famous Five 1: Five on a Treasure Island by Enid Blyton (1942).
640 x 480
(535 KB)
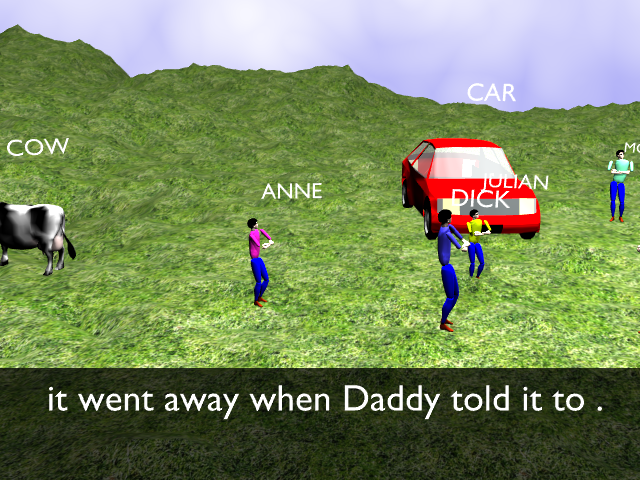
Figure 6.32(d): Cow scene from the Famous Five 1: Five on a Treasure Island by Enid Blyton (1942).
640 x 480
(533 KB)
Figure 6.33(a): Follow scene from the World of Tiers 7: More than Fire by Philip Jose Farmer (1993).
720 x 576
(613 KB)

Figure 6.33(b): Follow scene from the World of Tiers 7: More than Fire by Philip Jose Farmer (1993).
720 x 576
(723 KB)
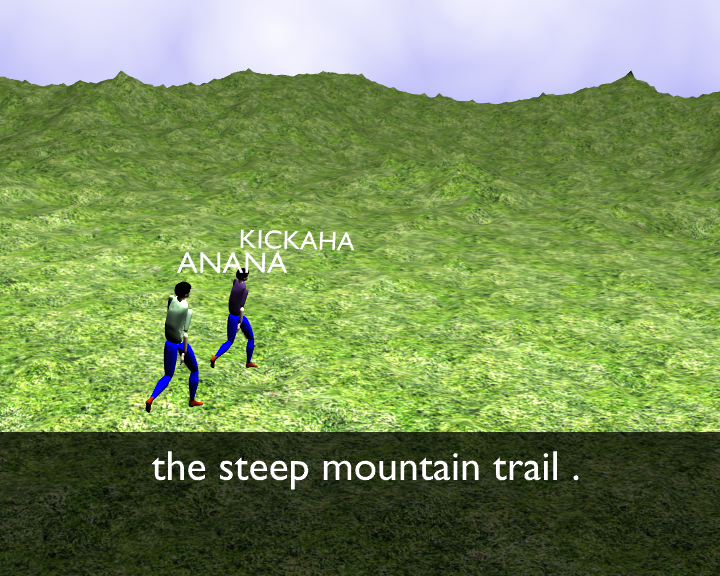
Figure 6.33(c): Follow scene from the World of Tiers 7: More than Fire by Philip Jose Farmer (1993).
720 x 576
(721 KB)
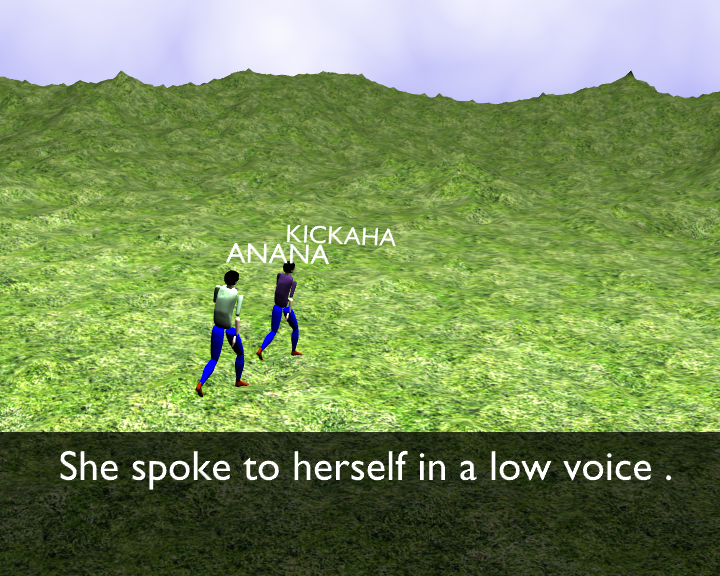
Figure 6.33(d): Follow scene from the World of Tiers 7: More than Fire by Philip Jose Farmer (1993).
720 x 576
(723 KB)
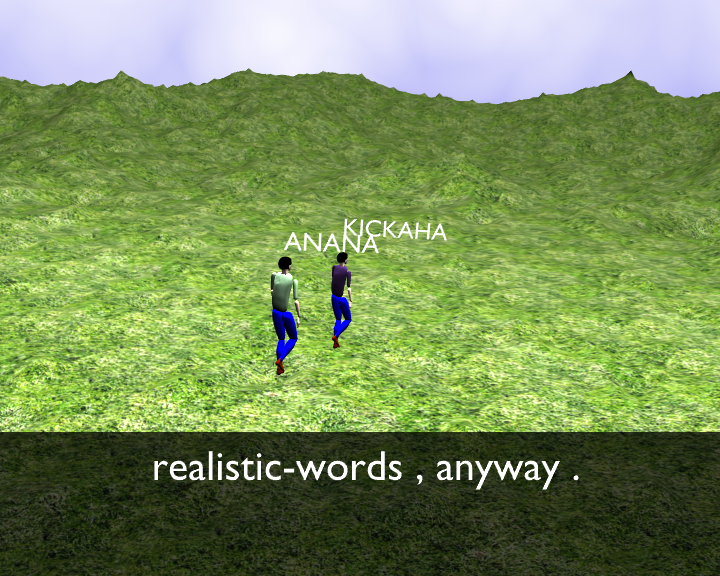
Figure 6.33(e): Follow scene from the World of Tiers 7: More than Fire by Philip Jose Farmer (1993).
720 x 576
(723 KB)

Figure 6.33(f): Follow scene from the World of Tiers 7: More than Fire by Philip Jose Farmer (1993).
720 x 576
(614 KB)
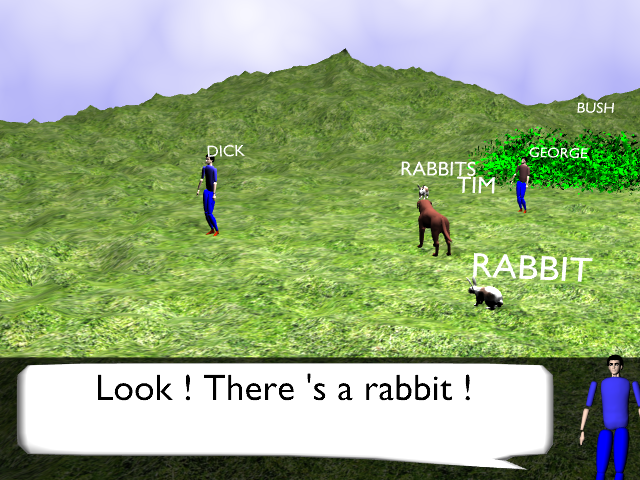
Figure 6.34(a): Rabbit scene (1) from the Famous Five 1: Five on a Treasure Island by Enid Blyton(1942).
640 x 480
(442 KB)
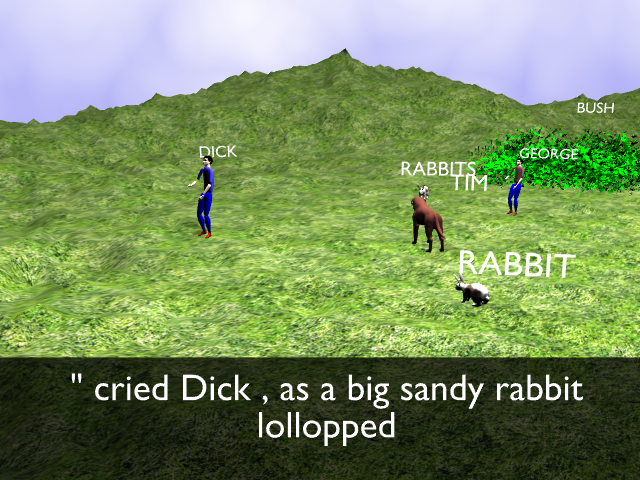
Figure 6.34(b): Rabbit scene (1) from the Famous Five 1: Five on a Treasure Island by Enid Blyton(1942).
640 x 480
(526 KB)
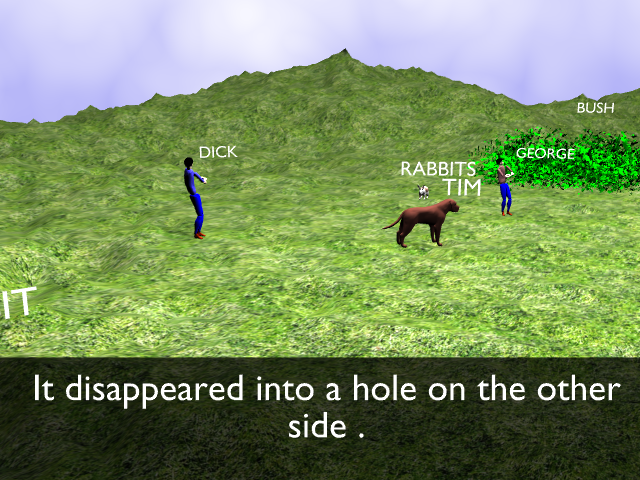
Figure 6.34(c): Rabbit scene (1) from the Famous Five 1: Five on a Treasure Island by Enid Blyton(1942).
640 x 480
(525 KB)

Figure 6.34(d): Rabbit scene (1) from the Famous Five 1: Five on a Treasure Island by Enid Blyton(1942).
640 x 480
(525 KB)
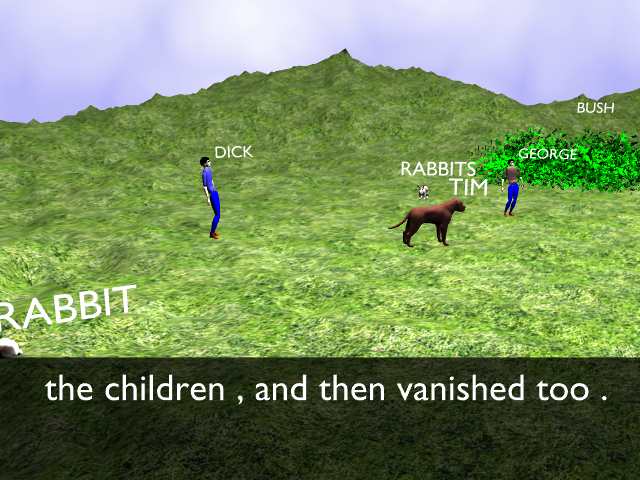
Figure 6.34(e): Rabbit scene (1) from the Famous Five 1: Five on a Treasure Island by Enid Blyton(1942).
640 x 480
(522 KB)

Figure 6.34(f): Rabbit scene (1) from the Famous Five 1: Five on a Treasure Island by Enid Blyton(1942).
640 x 480
(524 KB)
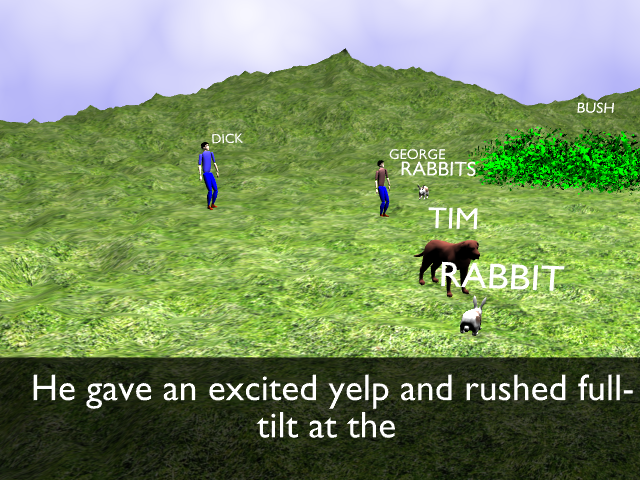
Figure 6.35(a): Rabbit scene (2) from the Famous Five 1: Five on a Treasure Island by Enid Blyton (1942).
640 x 480
(524 KB)
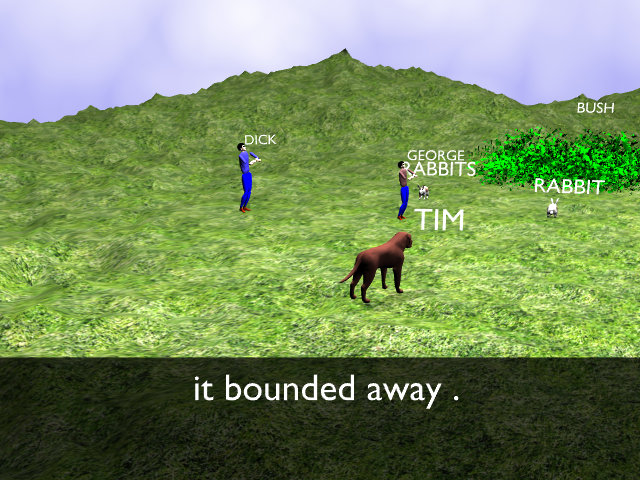
Figure 6.35(b): Rabbit scene (2) from the Famous Five 1: Five on a Treasure Island by Enid Blyton (1942).
640 x 480
(523 KB)
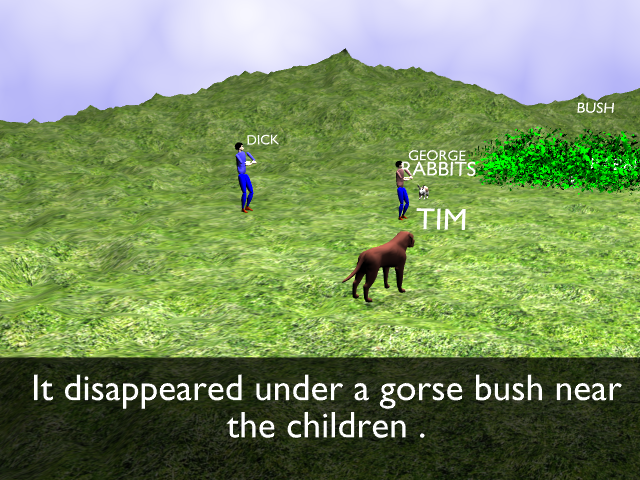
Figure 6.35(c): Rabbit scene (2) from the Famous Five 1: Five on a Treasure Island by Enid Blyton (1942).
640 x 480
(526 KB)
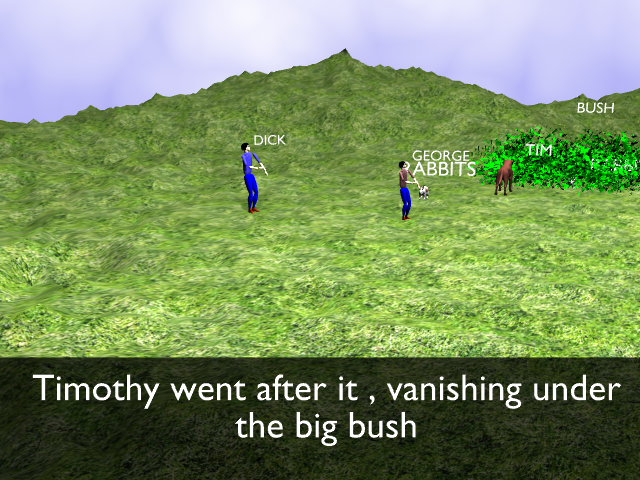
Figure 6.35(d): Rabbit scene (2) from the Famous Five 1: Five on a Treasure Island by Enid Blyton (1942).
640 x 480
(526 KB)
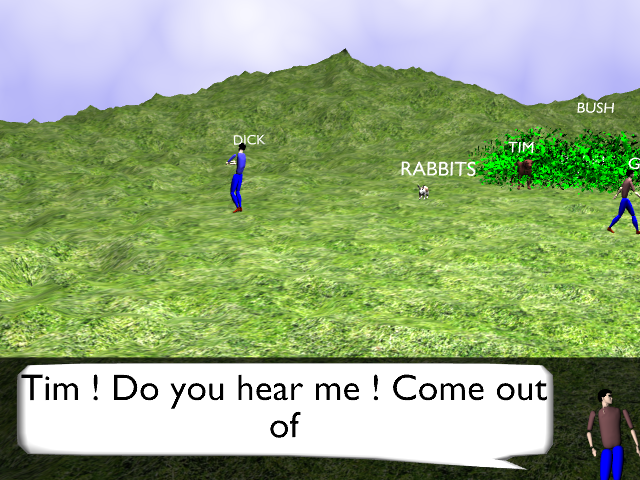
Figure 6.35(e): Rabbit scene (2) from the Famous Five 1: Five on a Treasure Island by Enid Blyton (1942).
640 x 480
(444 KB)
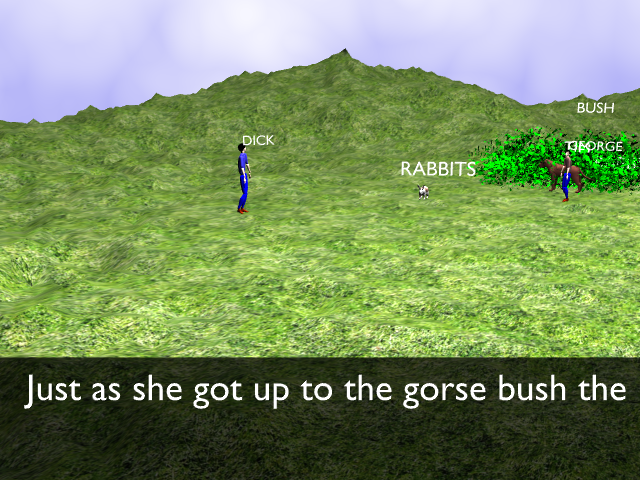
Figure 6.35(f): Rabbit scene (2) from the Famous Five 1: Five on a Treasure Island by Enid Blyton (1942).
640 x 480
(523 KB)
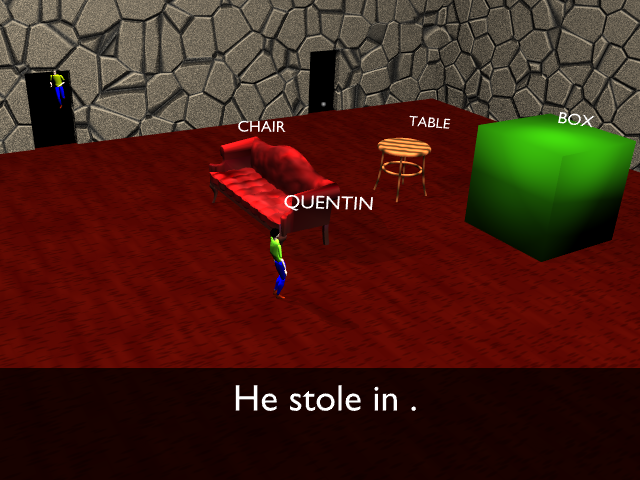
Figure 6.36(a): Study scene (1) from the Famous Five 1: Five on a Treasure Island by Enid Blyton (1942).
640 x 480
(340 KB)
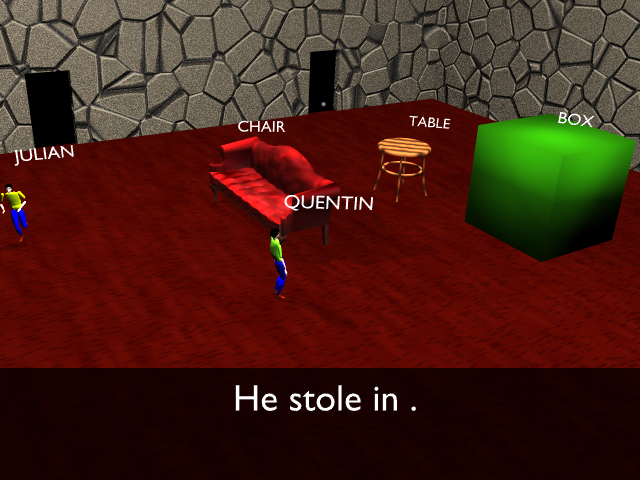
Figure 6.36(b): Study scene (1) from the Famous Five 1: Five on a Treasure Island by Enid Blyton (1942).
640 x 480
(342 KB)
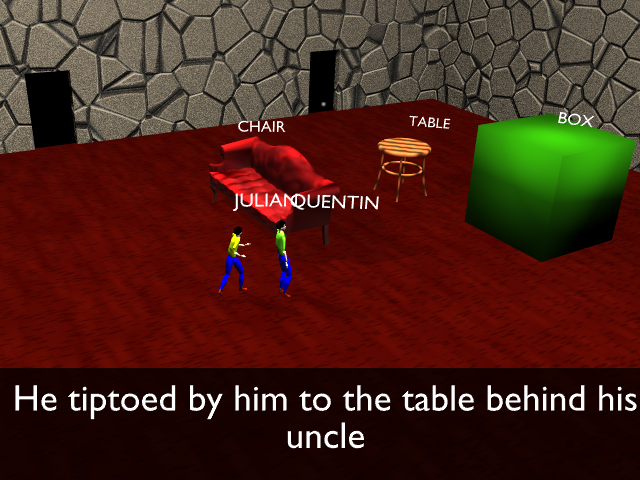
Figure 6.36(c): Study scene (1) from the Famous Five 1: Five on a Treasure Island by Enid Blyton (1942).
640 x 480
(346 KB)
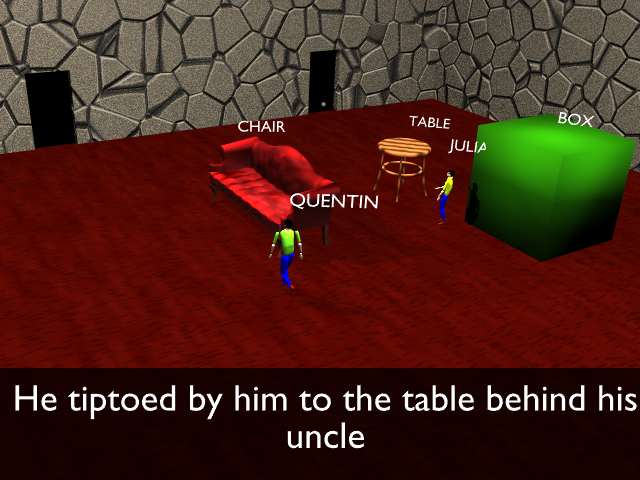
Figure 6.36(d): Study scene (1) from the Famous Five 1: Five on a Treasure Island by Enid Blyton (1942).
640 x 480
(345 KB)
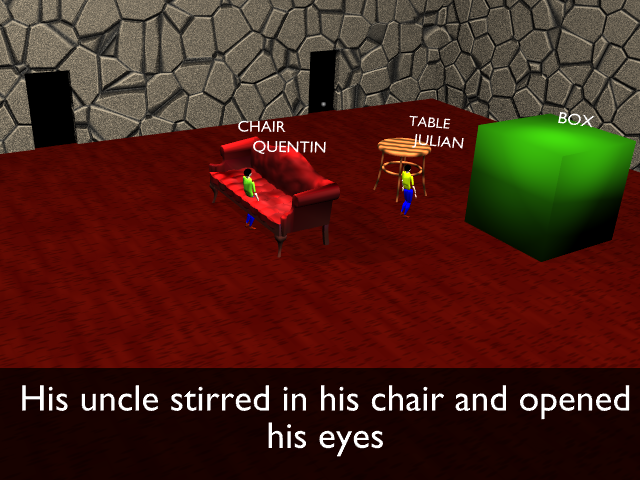
Figure 6.36(e): Study scene (1) from the Famous Five 1: Five on a Treasure Island by Enid Blyton (1942).
640 x 480
(342 KB)
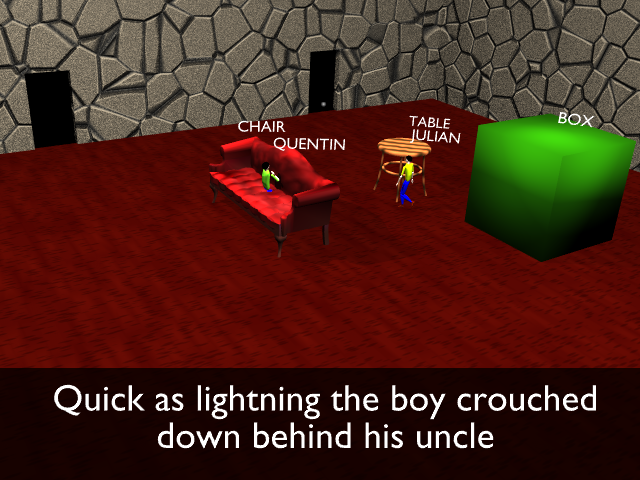
Figure 6.36(f): Study scene (1) from the Famous Five 1: Five on a Treasure Island by Enid Blyton (1942).
640 x 480
(343 KB)

Figure 6.37(a): Study scene (2) from the Famous Five 1: Five on a Treasure Island by Enid Blyton (1942).
640 x 480
(343 KB)
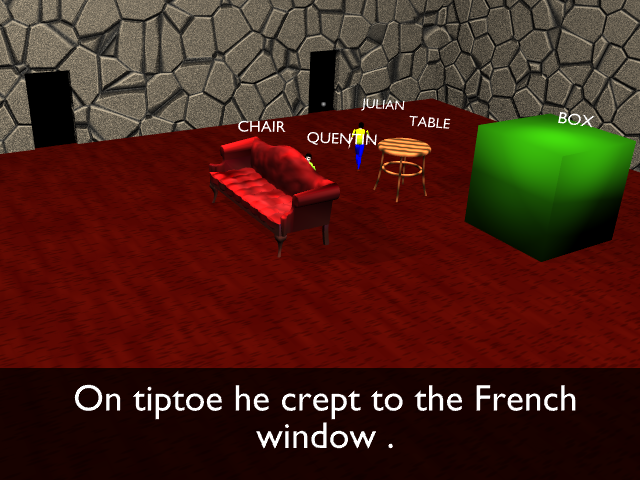
Figure 6.37(b): Study scene (2) from the Famous Five 1: Five on a Treasure Island by Enid Blyton (1942).
640 x 480
(340 KB)

Figure 6.37(c): Study scene (2) from the Famous Five 1: Five on a Treasure Island by Enid Blyton (1942).
640 x 480
(341 KB)
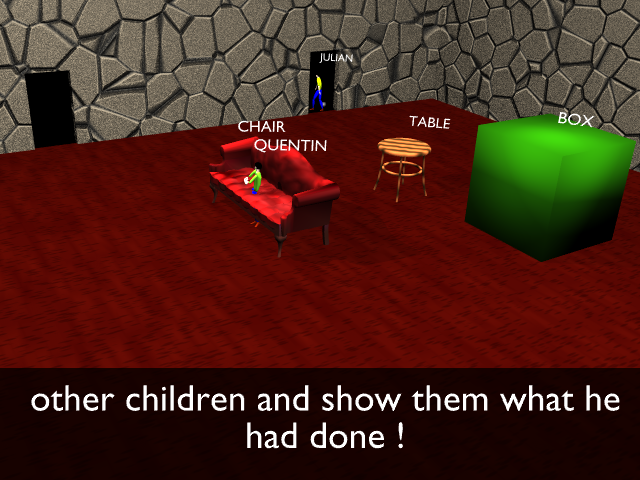
Figure 6.37(d): Study scene (2) from the Famous Five 1: Five on a Treasure Island by Enid Blyton (1942).
640 x 480
(341 KB)

Figure 6.38(a): House sequence from Narnia 2: The Lion, the Witch and the Wardrobe by C.S. Lewis (1950).
720 x 576
(773 KB)
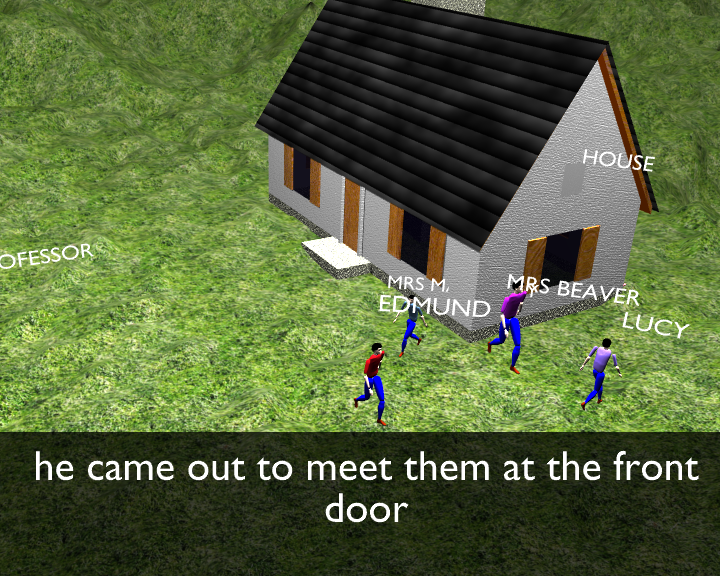
Figure 6.38(b): House sequence from Narnia 2: The Lion, the Witch and the Wardrobe by C.S. Lewis (1950).
720 x 576
(771 KB)
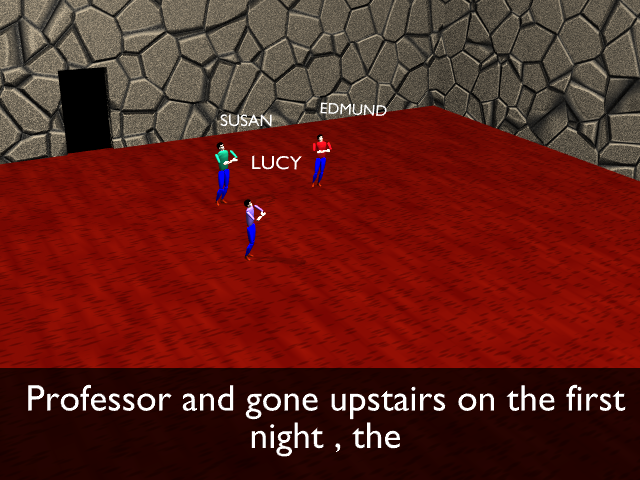
Figure 6.38(c): House sequence from Narnia 2: The Lion, the Witch and the Wardrobe by C.S. Lewis (1950).
640 x 480
(374 KB)
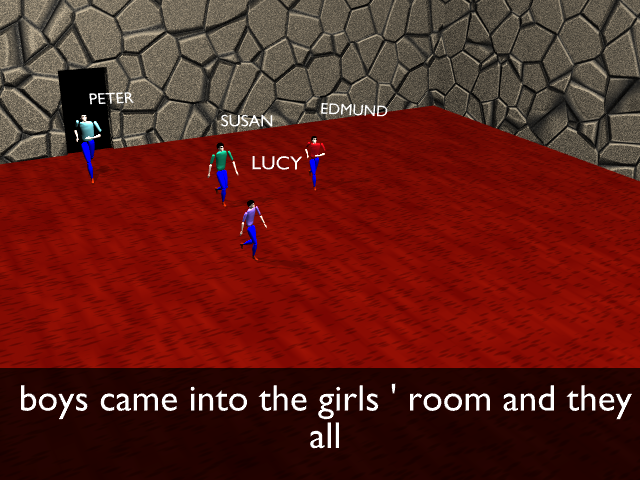
Figure 6.38(d): House sequence from Narnia 2: The Lion, the Witch and the Wardrobe by C.S. Lewis (1950).
640 x 480
(376 KB)
Figure 6.39(a): Travel sequence from the Famous Five 1: Five on a Treasure Island by Enid Blyton (1942).
640 x 480
(586 KB)
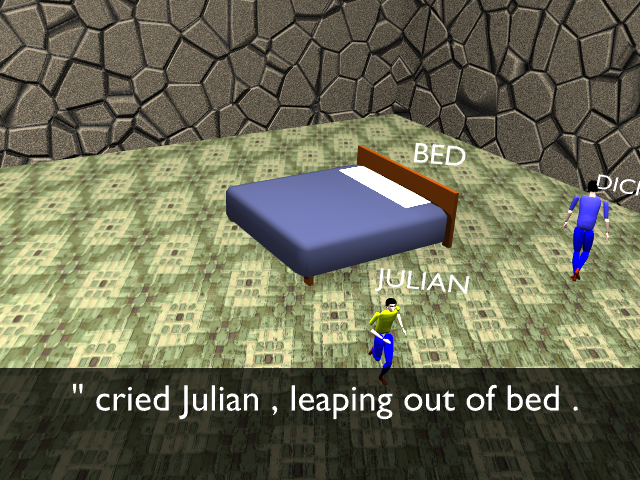
Figure 6.39(b): Travel sequence from the Famous Five 1: Five on a Treasure Island by Enid Blyton (1942).
640 x 480
(584 KB)
Figure 6.39(c): Travel sequence from the Famous Five 1: Five on a Treasure Island by Enid Blyton (1942).
640 x 480
(439 KB)
Figure 6.39(d): Travel sequence from the Famous Five 1: Five on a Treasure Island by Enid Blyton (1942).
640 x 480
(439 KB)

Figure 6.39(e): Travel sequence from the Famous Five 1: Five on a Treasure Island by Enid Blyton (1942).
640 x 480
(426 KB)
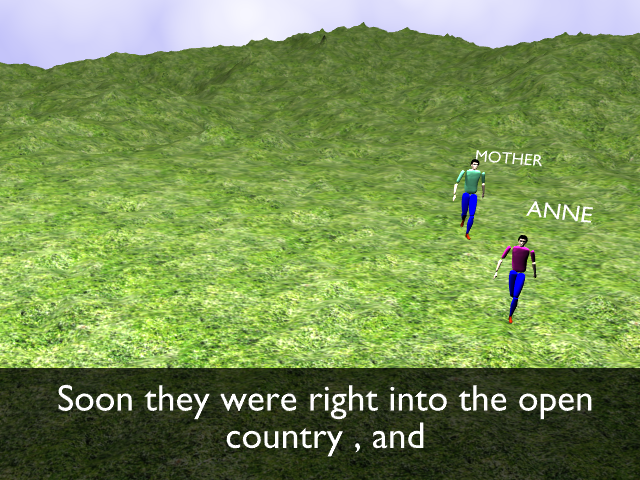
Figure 6.39(f): Travel sequence from the Famous Five 1: Five on a Treasure Island by Enid Blyton (1942).
640 x 480
(564 KB)